Google+

contact us

Use the form on the right to contact us.

Day or Night, we are here to serve you. Leave your plumbing problem to us.


Tinley Park, IL

(708)845-7922

Residential and Commercial plumbers and plumbing contractors available in Orland Park, Tinley Park, Oak Lawn, Palos Heights, Midlothian, Oak Forest, Homer Glen, Mokena, Frankfort, and the surrounding Chicago South Suburbs. Emergency plumbers.

copper water lines.jpg

Kevin Szabo Jr Plumbing Blog

Kevin Szabo Jr Plumbing is Tinley Park, Orland Park, Oak Forest, Midlothian, Orland Hill, Homer Glen, Mokena, Frankfort, Crestwood, Palos Heights, Oak Lawn, local plumber. Read our blog for advice, tips, a good laugh, and basic home improvement.

**We are moving our old blog to our new and improved website. Too see all our posts visit kevinszabojrplumbing.blogspot.com

Filtering by Category: February 2021

Choosing a New Safe

RH Business Marketing Solutions

image1.jpeg

Homeowners are always interested in learning the best ways to keep their homes and possessions safe and secure. Locksmiths can provide all the potential security measures to guard a home, from security cameras and alarms to smart locks. To ensure that valuables such as jewelry, cash, firearms, and documents remain protected and secure, a homeowner can invest in an in-home safe, which is the best defense if an intruder makes it past all the other home protections. 

Safes don't just offer protection against a burglar. They also guard against natural dangers such as fire and water. However, picking the right safe is crucial, and with the many options available, such as different certifications and technical attributes, it can be daunting to potential buyers. The optimal safe is one that provides security, protection, and ease of use.

When it comes to purchasing a new safe, here are a few factors to consider to make sure it matches the buyer's needs and requirements:

Size

The first determiner is the size and shape of the objects that will be kept in the safe to make sure that the correct size is purchased. It's always best to pick a safe bigger than the items to be stored to avoid overfilling it in the future.

Portability

A smaller, lighter safe is portable and can provide the ability to change its location easily. The smaller safe can be moved in case of an emergency; however, it is not recommended because it is also easy for a burglar to carry it. It is wiser to buy a safe that will be anchored in one spot.

Resistance to fire

To protect one's valuables, it is always advisable to choose a certified fire safe, which is made to resist high temperatures. Fire protection can range from 30 minutes to an hour. The best type of safe depends on the contents that will be kept in it.

Locking system

A decent locking system is pivotal in keeping the safe secure. A cheaper locking system will leave the safe vulnerable. The type of lock chosen affects the price and level of security. Fingerprint, electronic, and mechanical locks are all available; however, each has advantages and disadvantages. Combination locks are typically considered the best for safes when compared to keyed locks.

Wall safe recommendation

If the homeowner wants a wall safe, they should install one right before the painters update the interior wall color. That way, the paint won't be ruined upon installation of the safe and blending will be more seamless. 

Since so many people work from home these days, a wall safe could be optimal for holding important documents or other work-related items.

Steel thickness 

The thickness of the steel will decide the level of protection from burglars. It is measured by gauge, and a smaller gauge number means more thickness. A 12 gauge is considered the ideal thickness for a home safe.

Budget

Pick the safe with the highest grade that stays within the budget. Don't get one with tons of features that might not be necessary. However, don't purchase a low-quality, cheap safe.

Brand

It's best to research the ratings and reviews of different brands of safes. Choose a manufacturer that crafts quality safes and has good market standing.

An optimal safe is one that effectively protects valuables from issues that cause concern. Hire a residential locksmith for safe installation as soon as the right safe with all the correct requirements is chosen.

Guest Contributor: Richa Khandelwal

How To Reduce Bathroom Fog

RH Business Marketing Solutions

istockphoto-1084974874-612x612.jpg

It can be a big inconvenience when you're in a rush to get ready and a hot shower slows down your routine. Fogged shower glass doors and mirrors can be a pain, with condensation causing streaks and a dirty appearance once evaporated. Luckily, there are several effective ways to de-fog your bathroom and even keep fog from forming in the first place.

What Causes a Foggy Bathroom?

Many of us accept cloudy post-shower bathrooms as a fact of life: you take a long hot shower and, afterward, every mirrored and glass surface in the room is hazy. But what is the actual science behind your misty mirror and shower glass? Understanding why this fog manifests in your bathroom can help in finding a solution to the problem.

Bathroom fog is essentially the formation of condensation, or small water droplets, that form when water vapor in the air is quickly turning back into water. The heat from your shower causes the humidity level to rise and, when colliding with a colder glass door, creates condensation. Then these tiny droplets form and cling to your glass door and mirror, making them appear fogged over and hazy.

Condensation on clear shower door surfaces can leave them looking dirty and murky once the water fully evaporates. Wiping the fog off your mirror can cause streaks and even the reformation of pesky condensation. So, what are the best ways to reduce bathroom fog?

Run a Cold Shower "Warm-up"

Not many of us are built for prolonged cold showers – nor do you have to resort to shivering through your morning routine to eliminate fog. But turning the water to cold before you get going can help reduce fog from forming quickly. Run a cold shower for about 30 seconds before turning it to the desired hotter temperature. This little trick can help keep your shower space cool so that condensation takes more time to form.

This trick is most useful for those who take quick showers, as it only slows the formation of fog, rather than stopping it completely. So, get in and get out!

Improve Ventilation and Air Circulation  

Another simple way to combat fog before it forms is by controlling your bathroom's climate through proper air circulation. Open up windows or even crack your bathroom door enough to allow humidity to escape the small room. If it's too hot or cold outside to let the fresh air in, the use of a ventilation or exhaust fan can be a big help in pulling out hot, heavy air. 

Craft Your Own DIY De-Fogging Solution

Another solution for pesky bathroom steam lies in the power of common household products. For homemade fixes to be completely effective, they require regular application to glass and mirrors. Craft a 50/50 solution of vinegar and water in a spray bottle, add a couple drops of dishwashing liquid and use like any other glass cleaner for a few days of fog-free use. Alternatively, buff glass and mirrors with a microfiber cloth dabbed with toothpaste or shaving cream and wipe away with a clean towel. However, this method may require some trial and error, as certain products may just make the surface cloudy. Also, be sure to avoid products that contain abrasive ingredients that can scratch glass.

Use Anti-Fog Glass Products 

Fortunately, the fog problem has led to the formulation of specialty products specifically designed to combat bathroom condensation. Anti-fog coatings come in various applications, from sprays to liquids that are carefully applied with a cloth to cut down on the cloudiness of these surfaces significantly. They can be found in your local hardware store or ordered online.

From store-bought to homemade quick fixes, there are many solutions to reducing foggy shower glass and mirrors. Start utilizing these tips for a cleaner, fog-free bathroom user experience. 

Author Bio: Daniel Snow serves as Operations Manager for Glass.com®. Snow is also a contributing editor. He earned a bachelor’s degree in business management from George Mason University and has a background in the real estate industry. After high school, Snow even worked at a family-owned glass shop for a short period and is an Auto Glass Safety Council certified installer.


Blue Collar Eats - Eggsperts Breakfast & Lunch Cafe

RH Business Marketing Solutions

IMG_1582.JPG

Are you looking for a fresh new breakfast spot to try? Look no further than Eggsperts Breakfast & Lunch Cafe, located at 9218 W 159th St, Orland Park, IL 60462. They’re new to the town, and they’re “egg-sperts at what they do,” according to Kevin, also known as, “The Hungry Plumber”, our main host of the show.

This episode we brought along a good friend, Gerald, to be our co-host and try out all of the delicious meals to get an extra voice on the quality of the food.

IMG_1499_Original.jpg

We started off with a fresh, hot, handcrafted cappuccino and it did not disappoint. “That’s a good cappuccino right there,” says Kevin. He loves cappuccinos, so anywhere he has the opportunity to get one, he’s on it. Just like the picture above, they love incorporating little designs in the cappuccinos to make it even more enjoyable. They offer handcrafted lattes and cappuccinos with only the “freshest roasted coffee beans available.” The barista’s can get pretty creative with their designs, and there’s so many different drinks to choose from.

IMG_1550.JPG

The first thing Gerald dug into was the “Ham N’ Cheddar” breakfast pan pizza, which includes Wisconsin Cheddar cheese, diced ham with baked eggs. This breakfast pizza takes 20 minutes to prepare, so prepare to wait, but the wait is definitely worth it. “This is so Chicago,” says Gerald, “It’s like the deep dish we’re known for, but a breakfast one.” This breakfast pizza is loaded with flavor, you can taste every ingredient, and it always comes out steaming hot since it’s prepared by request.

IMG_1560.JPG

Up next, Kevin tried the “Steak N’ Egg Rolls” which consists of egg roll stuffed with scrambled eggs, beef tenderloin steak, grilled onions, green peppers, White American cheese, and served with a side of homemade garlic cilantro aioli sauce. “You don’t think of steak and an egg roll for breakfast, but it works!” Gerald says. He’s right, after just one bite of the Steak N Egg Roll, Kevin’s response was “delicioso” and a thumbs up!

The smoothies were another part of the meal that blew both Kevin and Gerald away. “Wow!” They both agreed that Eggsperts would be their new go-to place for smoothies. Gerald went on to add how he added boosters into his smoothie, Chia seeds being one of them.

IMG_1572.JPG

The pancakes were out of this world! “What’s perfect about these (pancakes) you don’t need to add syrup,” says Gerald. He said he would usually cake his pancakes in syrup, but these pancakes are light, fluffy, and the added toppings are just enough to not need syrup, but not overpowering. They ordered the “Pancake Flight Platter,” which consists of Cinnamon Roll, which consists of buttermilk batter topped with homemade icing and cinnamon sugar glaze, the Oreo Red Velvet Cakes, which is red velvet batter topped with crumbled Oreos and drizzled with homemade cream cheese icing, and lastly but certainly not least, the Taffy Apple, buttermilk pancakes topped with freshly sautéed Granny Smith Apples, caramel sauce, pecans, and a chocolate drizzle. All of the pancakes come with 4 stacks, which is plenty enough to satisfy anyone’s hunger.

Also mentioned is the “Chicken N’ Waffle Slices”, which is buttermilk fried chicken breast, served over a Belgian waffle slice, topped with home-made honey Dijon aioli, and served with a side of maple syrup. Gerald mentions how this too, is another Chicago thing, because most people didn’t know that chicken and waffles do indeed make a great dish together.

IMG_1580.JPG

Breakfast taco’s also make a great meal, it’s under the “Chef’s Favorites,” and it consists of 4 tacos on a soft flour tortilla with scrambled eggs, sausage, pico de Gallo, Mozzarella cheese, and queso fresco, topped with chipotle crema. They almost look too good to eat!

IMG_1548.JPG

Lastly, for dessert, they ordered the “Baked Apple Pancake,” which is oven baked, fresh Granny Smith apples, topped with a cinnamon sugar glaze. This also takes 20-25 minutes to cook, but your mouth will be watering when you see it coming towards your table. When you cut into it, it is so soft, gooey, and the smell of the baked Granny Smith fills your nose. This will leave you speechless!

Overall, Kevin and Gerald definitely recommend this place. “You get a taste of the downtown culinary arts brought to the south side,” Kevin says. “I will be coming back, no doubt!”

Guide to Relocating a Water Heater

RH Business Marketing Solutions

Guide to relocating a water heater (2).jpg

Guide to relocating a water heater

Water heaters are one of the essential appliances in every home. They provide hot water, and it's hard to imagine any modern household without it today. However, there are some situations in which you might want to consider moving your water heater to another location. Whether it's for convenience or necessity, it can be one of the most difficult tasks to complete. You will either have to find appropriate help or have your own expertise in this type of project. Either way, here is a Guide to relocating a water heater to help you with any doubts, which can provide you some valuable insights.

Things to consider when relocating a water heater

The entire process of relocating the water heater is more complex than you might assume. Not that it's impossible to do it on your own, but it requires a skilled pair of hands and a lot of experience. If you don't have the necessary skills, it's always advisable to have a professional plumber relocate the water heater for you. The specialists will do it more efficiently and will minimize any potential risks. Nevertheless, let's explain some of the most important details you should be aware of if you are considering moving your water heater to another location.

Picking the right location for your water heaters

If you are using a tankless water heater, you can place them almost anywhere. Then again, since they occupy so little space, there is usually no ordinary need to move them. But, a couple of common locations are often considered the best spots to place other types of water heaters. Also, there are a few situations when it might be necessary to do so.

So, let's start with locations:

  • Attic or basement - If you plan to move your water heater to the attic, there are things to consider. This might be a convenient spot to save more space in the rest of the house, but it has some drawbacks. In general, you might need to modify your attic to support heavier water heaters. And also, it's not so energy efficient because the water travels a long way to reach the ground floor. The situation with the basements is similar.

  • Bathroom and utility room - This is a more convenient location for your water heater. The best situation might be if your bathroom shares the same wall as the utility room. Actually, this is convenient in both vertical and horizontal manner.

  • The garage - This could be a great option if you have enough space in your garage. It's also a good option for larger tanks.

  • Outdoor - This can be a good location, especially for gas water heaters. It's safer, easier to install, and doesn't require significant modification to your home.

Before selecting the new location, you might want to consolidate your plumber. He can give you general advice about what pipe rerouting should be carried out and what safety measures to take.

Consider the size of your water heater when planning its location.

Consider the size of your water heater when planning its location.

Preparing the location

Moving your water heater is more than just picking it up, moving, and installing. In essence, you have to prepare the new location before anything else. Depending on the location, you might need to do some remodeling first. Besides extending and rerouting the pipes, you should also check if you need to modify flooring, reinforce walls, or perform similar modifications. That's why the best moment to prepare the room where your water heater will be moved to is when renovating your home. Of course, don't forget to clean your place from top to bottom after the renovation is complete. If you have just moved into a new home, for example, and want to do some serious remodeling, this is a perfect opportunity to complete two tasks at once.

Guide to relocating a water heater (3).jpg

Bathroom renovation is a perfect moment to consider a new location for your water heater.

Consider permits and requirements

In general, for significant structural changes, you might need permits. Of course, they are not the same in each area, so make sure to check if and when you need them. Depending on the type of location you have in mind for your water heater, it may involve some significant modification. Especially for projects that alter home plumbing connected to the city water supply. Or in areas that are susceptible to earthquakes and other natural perils. If you are not sure what permits you might need, you can always ask your plumber.

The situation when buying a new (old) home

If you are moving to a new place, you will probably plan to change a few things, especially if it's an older building. In some cases, bringing your recently acquired water heater can be a useful upgrade. Like moving your water heater within the same house, this situation also requires preparing the location in advance. You will have to get your bathroom ready and finish some modifications if necessary. Moving your water heater to a new home is a great way to keep the convenience of modern solutions even in older structures.

Relocating a water heater step by step

Once the preparations are over, it's time to relocate your water heater. Here is how to do it step by step:

  • Turn off and disconnect the power supply - If it's a gas water heater, you should always call a professional because it can be hazardous.

  • Shut off the water - turn the water off in your house or shut the main valve responsible for the room where the water heater is.

  • Drain the water - drain all water from your water heater

  • Disconnect the pipes - make sure all pipes are disconnected from your water heater. Also, disconnect inlet pipes first and give it some time to drain the rest of the liquid if anything has remained. Remember, be careful when doing this step. Most pipes are delicate, and you don't want to damage something.

  • Uninstall and transport - with everything above complete, you can safely remove your water heater. But, consider taking additional precautions when transporting large heaters to another location. If you damage your heater, then the whole process will be in vain.

If you own a gas water heater, it's always recommended to let a professional plumber do it. Again, dealing with gas systems can be dangerous, so you don't want to take unnecessary risks.

Always consider calling a professional plumber, for he has all the knowledge and tools

Always consider calling a professional plumber, for he has all the knowledge and tools

Finally, everything is ready to reconnect your water heater to a new location carefully. Take all the precautions to connect everything right and check if something requires replacement. Relocating a water heater is a complex task, but it should be up and running in no time if everything is done right.

Guest Contributor: Sophia Perry

Reasons You Need to Insulate Your Garage Door

RH Business Marketing Solutions

1475019544237.jpeg

As long as your garage door is functioning, you have nothing to worry about, right? Wrong! Your garage door does more than ensure that your home and properties are safe from unknown entities. Your garage door also helps protect your home from unpredictable weather. Its goal is to keep your garage and home cool when it is extremely hot and humid outside and vice versa. This is why garage door installers always recommend that homeowners insulate their garage doors.

An insulated garage door usually has two layers of whatever the primary material is, plus a layer of insulation between them. Non-insulated designs or models have only one panel of wood or metal. Insulated garage doors are thicker, sturdier, and able to withstand extreme temperatures. 

Types of Insulated Garage Doors 

There are four types of insulated garage doors: steel, aluminum, wood, and fiberglass. 

Steel insulated garage doors are made using faux wood cladding and other composite materials. An aluminum insulated garage door is lightweight, rust and corrosion-resistant, and durable. It has an extra layer that provides additional protection against dents. 

The wood type is favored by homeowners who want natural-looking insulated garage doors. These doors are made of redwood, hemlock, or cedar. Wood insulated garage doors have two layers of wood and a layer of insulation, or one layer of wood plus a layer of veneer. Their rich and warm looks can make your garage and home more aesthetically pleasing. 

Fiberglass insulated garage doors are created using a steel frame and fiberglass sheeting (two layers). They are lightweight but can easily get damaged. Additionally, they are made to look like wood.    

Regardless of type, an insulated garage door is measured through its R-Value. If it possesses a high R-Value, it allows slower transmission of heat and is, therefore, more energy-efficient.

Benefits of Using Insulated Garage Doors 

Homeowners who have been using insulated garage doors for years enjoy many benefits. Some of these advantages include heat loss reduction, protection from outside weather, and increased energy efficiency. 

Here are the reasons why homeowners should insulate their garage doors. 

Energy Efficient (Better Temperature Control) 

Insulated garage doors increase energy efficiency because the indoor temperature is more consistent and will not fluctuate. If it’s the summer season, the heat won’t penetrate your garage because of the insulation. During the winter season, the insulation will protect your garage from the freezing cold. 

You do not have to open the garage doors because it’s too hot in the summer months or too humid in winter (as you are cooped up indoors). Also, you do not have to keep raising or lowering the thermostat in your home. Thus, you save on energy consumption and bills. 

The Department of Energy suggests that homeowners insulate not only their garage doors and walls but also the home’s foundation and roof. 

Durability 

As mentioned above, insulated garage doors have several layers of the chosen material (steel, wood, fiberglass, or aluminum). Thus, they are rust-resistant and more durable than the non-insulated designs. Insulated garage doors also require very minimal maintenance. Likewise, you do not have to keep replacing them only a few months after use. 

More Functional 

Insulated doors make your garage more homey and comfortable. You can use some of the space and turn it into something functional. For example, you can turn one corner into an area for entertaining friends and visitors. You can put in a small couch, coffee table, and a couple of armchairs. 

You may also want to convert the extra space into your living area or a small playroom for the kids so you can watch them while you’re working on your car. Another idea would be to build a small workshop space where you can conveniently work on your crafty projects. 

Your garage is cozier and more relaxing because its insulated doors protect it from extreme weather conditions. Temperature is stable, consistent, and comfortable. This makes it more useful and functional. 

Quieter and Lesser Noise Pollution 

Insulated garage doors do not rattle and creak as much as non-insulated doors. The doors are sturdier, steadier, and stronger because of the insulation, so they do not vibrate and create a lot of sounds.

Additionally, your insulated door also blocks off external sounds, such as those coming from outside the garage. The insulation works somewhat like a sound barrier, so sounds or noises are muffled. 

Safer 

Your sturdy, steady, and strong garage door will help protect your home against burglars. The insulation adds an extra layer, which makes your door difficult to destroy and penetrate. Heavy-duty designs are even more challenging to break.

Set up an appointment with an insulated garage door specialist and start making your garage and home safer, cozier, more energy-efficient, and comfortable.

Guest Contributor: Irene Trentham

Front Door Installation: 4 Useful Tips from Professionals

RH Business Marketing Solutions

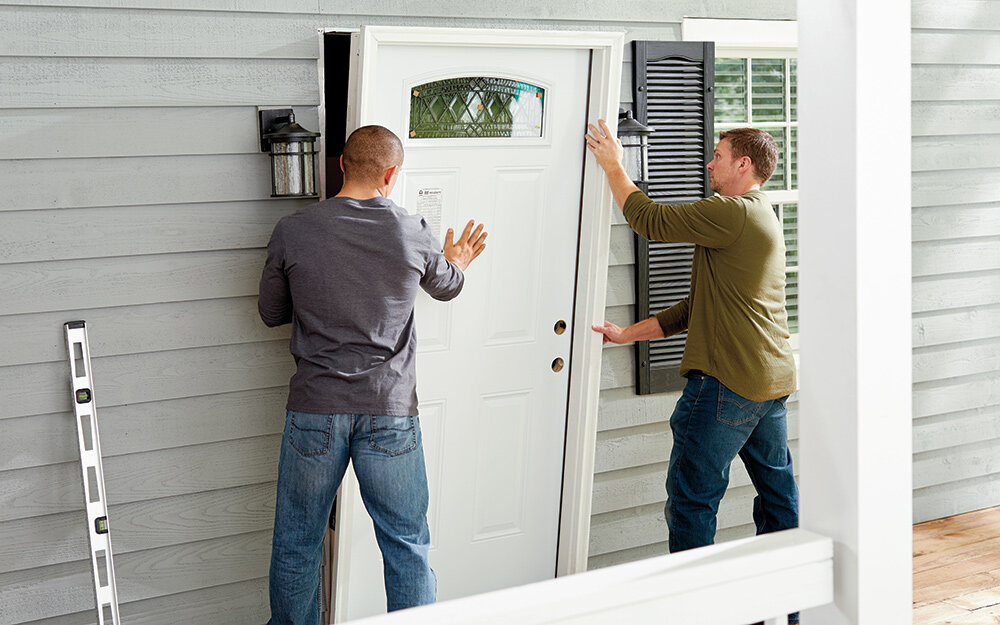
How-To-Install-A-Door-Step-5.jpg

Many homeowners spend lots of time picking out the perfect pieces to install in their home. Regardless of whether or not it is the home of your dreams or simply an investment property, a beautiful front door is an effective way to beautify your home. However, splurging on an attractive door is worthless if it is not properly installed. Installing or hanging a new door is a process that can take time, and it involves several variables. It can be challenging, but it isn’t rocket science. According to the door experts at ETO Doors , there are some tried and true professional hacks that can increase your odds of a successful and stress-free installation. Get your tools together, take your time, and consider these 4 tips before you tackle the installation of your new front door. 

Measure twice, cut once

We have all heard the classic saying, “measure twice, cut once”, but before you purchase a new door, you should definitely be sure to make some measurements of your own. Measure the door that you will be replacing. This is without a doubt a necessary starting point. Make sure that you’re using the tape measure correctly, with the end of it butted flush against a surface perpendicular to that which you’re measuring. 

If you buy a pre-hung door, as we recommend, you should make sure to measure the existing door frame, as well, as you will need to remove it to accommodate the new frame. Just measure the jamb width (from the front of the door jamb’s exterior to its interior side), as well as the jamb’s overall dimensions as it sits in the opening. 

Measuring the door, itself, is very easy. This can be done while it is still hung. However, you should also be sure to measure the door opening, as well. It is important to make sure all sides are even and that everything is square. Measuring this opening requires the removal of the door frame trim. To remove the trim without damaging the paint or drywall around it, you can shim a metal putty knife between the trim and wall before using a pry bar to remove it. The putty knife buffers the pry bar. 

Once your door opening is completely exposed, you can measure it and determine how much space you have for your new door, as well as whether or not your opening needs to be addressed before moving forward.  Your top and bottom measurements should be within ½” of one another for a functional door opening. The same applies to the sides of your opening. He also recommends making sure everything is level during this stage, especially the floor. 

Get your things in order

Your initial step in the installation process should be to assemble all necessary tools and material before removing the original door and beginning the installation of the new door. This can prevent the chances of additional difficulty as you work to get the new door installed. Having all the necessary tools and materials nearby and ready to use will help you get things done efficiently and with minimal headaches. 

Some of the tools you will probably need are:

  • Power drill

  • Hammer

  • Pry bar

  • Utility knife

  • Medium sized level (around 4 feet)

  • Carpenter pencil

  • Tape measure

  • Powered circular saw

  • Countersink drill bit

  • Safety equipment (safety glasses, leather gloves, hearing protection)

Besides the door, some of the materials generally needed:

  • Hardware (hinges, deadbolt/lock, doorknob)

  • Wood shims

  • Pressure treated lumber

  • Nails (galvanized)

  • Latex caulk

  • New wooden trim

  • Cement screws

  • 3-inch wood screws

  • Temporary wood blocks (5-inch blocks of 2x4 wood to use to help you hold the door up while you’re installing it)

Buy Pre-Hung

One way to make things easier on yourself is to buy a pre-hung front door. This removes the hassle of having to install hinges perfectly in the frame. If you buy pre-hung, the door will come installed in its own frame, so all you’ll have to do is make sure that the frame fits in your doorway, remove the old door, and install the new door + frame as level as possible. 

Installing a pre-hung door requires removing the original door frame. After removing the existing trim, you may need to use a reciprocating saw to cut through the nails that fasten the frame into the wall. Otherwise, you can use a pry bar to get it out. 

Inspect your floor

As we’ve stated, many door experts recommend making sure that the door sill is level before installing the new door. This can prevent complications in the future, and ultimately make installation easier. However, you should also take the time to inspect the floor and subfloor for any signs of damage. Things like water and termites can get into your door opening and settle in the flooring around it. The installation phase of a new door is the perfect time to check everything over and make sure the area is not in need of some additional attention.

Conclusion

Installing a new front door can be a daunting task; many people tend to leave it to professionals. However, there are many great resources out there that you can use to make things easier (including this article)! As with anything, do your homework, prepare as much as you can in advance, and take your time. Be persistent if you encounter any problems–don’t let yourself get discouraged. It can be surprisingly gratifying to successfully install a new door all by yourself, and open/close it for the first time. 

Guest Contributor: Novo Benaojan

The Deep Impact COVID-19 Will Have on Restroom Design

RH Business Marketing Solutions

image1.jpeg

Now that the vaccination against COVID-19 is finally underway, the whole planet hopes that the virus will subside in 2021 and be eradicated in the following years. However, the world is changed forever, from the rise of online shopping to the way we wash our hands. After COVID, public restrooms will never look the same.

Toilets that sanitize themselves

You can be careful as much as you want but you simply gave to have contact with surfaces in the toilet. Whether it’s flushing the toilet or sitting on the toilet seat, it’s hard to avoid all the germs lingering there.

Sure, some people use a combo of wet wipes and perhaps toilet paper but in the end, you have to touch at least one surface. For this reason, self-cleaning toilets have become popular during the pandemic, especially in Japan, where they have singing toilets as well.

Essentially, once a person leaves the cubicle and closes the door behind them, the toilet sanitizes all the surfaces inside the cubicle. Some of these toilets feature a motion sensor on the toilet lid, further decreasing the chances of an infection.

Exiting the toilet like a boss

Speaking of toilet surfaces you cannot avoid touching, the doorknob first comes to mind. Just imagine how many people have touched the doorknob of a restroom in a shopping center or an airport before the cleaning staff had the chance to sanitize it.

The best way to get rid of this danger is to remove the bathroom door altogether. However, this means that unpleasant smells from the bathroom will spread through a restaurant, for example, which is unacceptable.

The solution to the problem are automatic doors that are activated using a motion sensor. Just like the door on the local supermarket, the bathroom door would open and close as people approach it, obviating the need to touch the handle.

Next-generation soap dispensers

Apart from wearing a protective facemask, washing our hands regularly is one of the surest ways to prevent a COVID-19 infection. However, public restrooms cannot keep soap bars, as this practice would be unsanitary.

Luckily, there are commercial soap dispensers that are fully automated. Just like a self-cleaning toiler or an automated door, the next-generation soap dispenser has a motion sensor inside that automatically dispenses liquid soap when you place open palms underneath it.

Contactless hand dryers

After we are done washing our hands, it’s time to dry them up. Neither cotton nor paper towels are a sanitary-friendly solution for a public restroom. After several people dry their hands, the towel and the towel rack would be crawling with germs.

That is why contactless hand dryers are being installed in toilets worldwide. They operate using a motion sensor, so needn’t touch them to turn them on or off. There are several types of hand dryers but the most efficient are the so-called air blades.

Improved air ventilation

At the onset of the 21st century, air pollution did not go away but it became a global problem. Viruses are roughly the same size as dust particles, so air ventilation is quite important in enclosed spaces, such as restrooms.

If you wish to stop the spread of an airborne virus, then air circulation inside has to be impeccable. Restroom owners are expected to invest in upgrading HVAC ventilation systems, which contain value filters that remove microbes and particulates, making the air less stuffy.

Water taps you needn’t touch to operate

Returning to the topic of washing hands, even if you have access to a brand new bar of soap in a public bathroom, you will have to close the tap at the very end. However, more and more water taps are sensor taps that operate similarly to contactless air dryers and soap dispensers.

Public restrooms won’t be the only places where sensor taps will be installed post-COVID-19. Namely, both clients and contractors will want to install such water taps in new buildings, so sensor taps will become a common sight in residential structures as well.

Hopefully, this water fixture will prevent the appearance of a potential new pandemic

As you have seen from our example, the average public restroom will be deeply altered after the coronavirus pandemic is long over. Motion detection is the technology of the future whether we are talking about a soap dispenser or the bathroom door.  

Mike is an Australian business consulting specialist. He’s working with companies that outsource their IT maintenance. He often writes about technology, business and marketing and is a regular contributor on several sites.

Slab Leaks: Warning Signs to Look Out For

RH Business Marketing Solutions

plumber_repair_slab_leak.jpg

When it comes to slab leaks, most homeowners agree it is bad news. A concrete slab acts as the foundation of the house you live in. Typically, a slab foundation is used in place of a basement or crawl space. If your house is built on a slab foundation, the plumbing pipes that supply water to your home are located beneath it.

Unfortunately, there are instances when the pipes below the surface can leak. This is known as a slab leak. One of the most distressing things about slab leaks is they can be difficult to detect. If anything, early slab leak detection can make a world of difference. The sooner you spot a leak, the better!

Common Warning Signs of a Slab Leak

Below are some of the most common signs that point to a slab leak:

High Water Bills

If you notice a significant spike in your water bills but won't be able to justify them through your usage, you may have a slab leak. At times, there are valid reasons for the increase in water bills. 

Perhaps you have run your lawn sprinklers, filled your swimming pool, or hosted overnight guests. However, if you are certain there's no change in your actual water consumption, you likely have an undetected slab leak.

Hearing Running Water

The sound of a leak from the toilet is noticeable since most homeowners are familiar with it. However, if you pay close attention, you can also hear the sound of running water if you have a slab leak. If you suspect you have a slab leak, turn off all your taps at home and try to listen for sounds of running water.

However, it can be difficult to really know for sure as the sound can be deceiving. At times, it can seem like the water is running inside the walls and not under the foundation. In line with this, it would be best to have a professional plumber perform leak detection.

Hot Water Fluctuations and Water Pressure Decrease

If you notice that your water turns cold in an instant or the water pressure suddenly drops, it can be an early sign of a hot water slab leak. When a pipe leaks under the slab, the water flow can get disrupted and create pressure fluctuations. 

Visible (or Smell) of Mildew or Mold

When water from a slab leak makes its way to your flooring, mildew and mold can become an inevitable consequence. If there is no noticeable warped hard flooring or darkened carpet spots, the smell of mold or mildew should give you a hint of a possible problem.

Slab leaks will not affect your flooring alone. At times, you might see mold in the walls as well. If you notice a specific smell, consider investigating where it is coming from. You can also point out the area where you notice the smell to a professional plumber so they can double-check.

Warm Spots

If your hot water line at home has a leak, you might be able to find where the leak is by checking for abnormally warm spots on your floor. If you have thin linoleum or carpeted floors, warm spots can be easy to find. 

If you have a tile floor, it can be challenging to detect unless the leak is too severe and causes water to flow into the space between the tiles and the adhesive. If you have hardwood floors, finding a warm spot on the floor can also be challenging.

Raised "Dome" on the Floor

If the leak is very severe and has been going on for a while, you might notice flooring damage in the form of warps on the floor. Another common sign of severe water damage is the formation of a dome or raised areas on your floor. 

While the presence of a dome on the floor can indicate the leak's location, it can also mean severe damage to the home's foundation.

Conclusion

While slab leaks can be difficult to detect, they can be very costly when left unattended. If you notice any of the signs mentioned above, it would be best to have a professional plumber inspect your property right away. Licensed plumbers can detect slab leaks and repair them before they can result in significant structural damage and costly repairs.

Guest Contributor: Anthony Quinn

Red Flags Before Hiring A Home Contractor

RH Business Marketing Solutions

red-flags-before-hiring-a-home-contractor_5e94ca9b8f0ac_w1500.jpg

Guest Contributor: craftjack.com

How To Select The Perfect Bathroom Fixtures For Your Style

RH Business Marketing Solutions

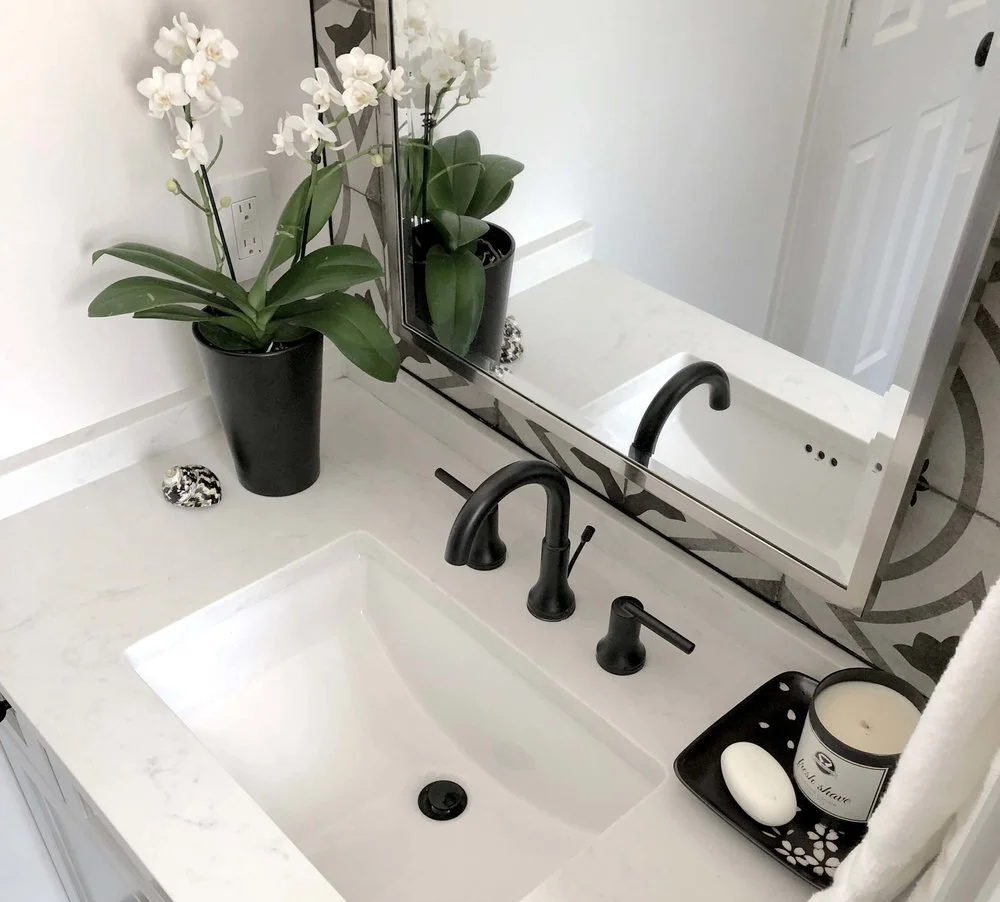
Black+bathroom+faucet+after+bath+remodel.jpeg

How To Select The Perfect Bathroom Fixtures For Your Style
Bathroom fixtures do far more than accessorize. Used well, they make the bathroom design feel cohesive and finished; used poorly, they make it look mismatched and off. This is exactly why many homeowners get overwhelmed in the design process of a new bath: the potential for making or breaking a room’s whole vibe can feel like a lot of pressure. How do you pick pieces you’ll love for the long haul? What’s the key to avoiding choices you’ll regret later? Whether you’re building a new home, renovating your bathroom or for any other reason to wander through the maze of bathroom fixture possibilities, here’s a guide for how to select the right products for you.   

  1. Start with your budget. Knowing what you can afford to spend sets clear limits for your fixture shopping. For this reason, take time upfront, before purchasing anything, to set a budget for your bathroom project. If nothing else, a budget narrows your world of options, simplifying your search.

  2. Pick a finish. Once you know your price range for fixtures, it’s time to start exploring. Right away, you’ll notice there are a lot of finishes available, such as brass, nickel, chrome, bronze, black, copper, stainless steel, polished, satin and antiqued. To know which direction you want to go, you can browse magazines, the Internet, model homes or the bathrooms of friends. You can also take into account what finishes are in the rest of your home. If all your other household fixtures are chrome, for example, you may wish to stay with that theme. That said, feel free to mix metals for a look that’s all your own, too. If you’re totally unsure which direction to go, timeless choices include bronze and brass or brushed nickel.

  3. Select a style. Even once you’ve selected a finish, your decision-making isn’t done. Search through only matte black fixtures, for example, and you’ll still have to decide among modern, traditional, industrial and more. To know which style to go with, consider the rest of your home and what aesthetic you lean towards: classic and traditional, modern and minimal, items with ornate detail, or something else? Identifying what you like can help guide you to the fixtures that fit your taste.

  4. Consider sustainability. If possible, opt for environmentally friendly, non-toxic materials. While any fixtures sold at a normal U.S. retailer need to be certified free of lead, for example, that’s not to say all faucets and fixtures are safe. Always look for the National Sanitation Foundation (NSF) certification of safety, and, if you’re interested in conserving water, look for products with WaterSense® labels.

  5. Compare favorites. At this point, you should have whittled down your options to a manageable number, making your decisions a bit simpler. Order samples if possible, so you can touch materials, hold them up in your space and get a good sense of how they’ll work. You could also make mood boards or mockups to help you visualize potential the project and any tweaks to make it just right. From here, you should be able to gain confidence in what fixtures will fit your bathroom.

  6. Make your selections. Last but not least, order your products. Be sure not to overlook anything important, such as the sink drain, plumbing valves or the toilet lever. Likewise, don’t forget a toilet paper holder, if you need one, and a towel bar and/or robe hooks; important accessories that serve a purpose and tie the space together Other possibilities worth exploring are mirrors, light sconces or an exhaust fan, as well as pendant and recessed lights.

Outfitting a bathroom with beautiful fixtures doesn’t have to be daunting. By following the six steps above, you can save yourself time and headaches in making the best selections for you. Invest a little thought and planning now, so you can choose fixtures you’ll love both now and well into the future.

AUTHOR BIO: Carmen Fiordirosa is Vice President of Marketing for Gerber, a manufacturer of high-quality kitchen and bathroom plumbing products. Fiordirosa, who has more than 18 years of experience in the marketing industry, focuses on earning the trust of trade professionals and homeowners alike who find value in products that have both style and substance.