Kevin Szabo Jr Plumbing Blog — Kevin Szabo Jr Plumbing - Plumbing Services│Local Plumber│Tinley Park, IL Google+

contact us

Use the form on the right to contact us.

Day or Night, we are here to serve you. Leave your plumbing problem to us.


Tinley Park, IL

(708)845-7922

Residential and Commercial plumbers and plumbing contractors available in Orland Park, Tinley Park, Oak Lawn, Palos Heights, Midlothian, Oak Forest, Homer Glen, Mokena, Frankfort, and the surrounding Chicago South Suburbs. Emergency plumbers.

copper water lines.jpg

Kevin Szabo Jr Plumbing Blog

Kevin Szabo Jr Plumbing is Tinley Park, Orland Park, Oak Forest, Midlothian, Orland Hill, Homer Glen, Mokena, Frankfort, Crestwood, Palos Heights, Oak Lawn, local plumber. Read our blog for advice, tips, a good laugh, and basic home improvement.

**We are moving our old blog to our new and improved website. Too see all our posts visit kevinszabojrplumbing.blogspot.com

Best 5 DIY Decor Ideas For College Dorm Room

RH Business Marketing Solutions

Colleges have evolved from austere learning centers to more relaxed venues reminiscent of country clubs. Rutgers University’s $55 million Rockoff dorm features a Coldstone Creamery and a next-century gym, while MIT has a ball pit and Boston University has a climbing wall.

In this setting, dorm decor has come to resemble a competitive sport, with design-savvy students betting on their imagination to decorate their space with style. Check out our top 5 DIY decor ideas for college dorm rooms to get inspired and make your dorm the talk of the town!


1.   Inspirational phrases

Dorm room decor that includes inspirational sayings or quotes is very trendy right now. You might walk by a classmate's dorm and see the phrase "You're not a pigeon, you're a unicorn" artfully typeset on his wall, or a pillow with the phrase "C'est la vie" on it. Wouldn't this be a refreshing experience after a long day of exam prep or honing your writing skills with professional trust my paper services? We think it would. Even if you find motivational sayings corny, you can pull them off with a creative flair. Instead of outmoded old adages, you could opt for fancy typography.


2.   Relax in style

Decorating your sleeping space to turn it into an intimate relaxation area can transport you back to the safety of the womb. This could mean hanging an elegant curtain, investing in top-quality mattresses and pillows that are also tastefully decorated, or placing a sunflower beside your bed.

Choosing comfortable bedding is likewise essential if you want your dorm room to feel like a home away from home. What's more, it shall grant you a good night's sleep, which is essential for your health. This is the case when you can chase two rabbits and catch both: your bedding can be functional (helpful for a good night's sleep) and aesthetically pleasing (a nice addition to your decor).


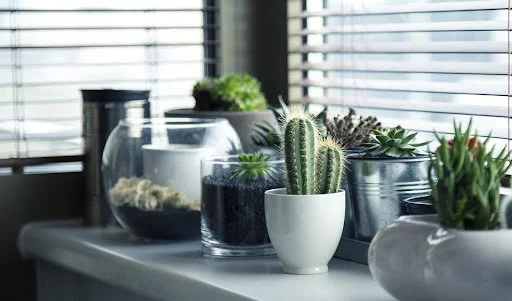
3.   Borrowing from nature

Have you ever wondered what makes some dorm rooms feel so inviting and warm? It's not just because you're a fan of your friend’s posters or enjoy the company, though, both count. It's because your college buddy understands that any space feels more authentic if embellished with natural fibers such as wood, wool, or wicker. Adding decor elements sourced from mother nature will ensure your dorm room radiates an instant homey feel. 

Though taking design cues from nature is nothing new, the trend is seeing renewed popularity among college students as part of a wider greenery trend.


4.   The power of color

It doesn't require much head-scratching to understand how colors can lift our moods. Colors have energy frequencies; we're directly influenced by being around them.

Revive your dorm room with colors that make you happiest. Arranging a visual landscape will not only add to the overall decor of your room but also instill a sense of calm. Add flashes of on-trend neon to liven up your compact flat, and opt for relaxing blues for setting up your study corner.


5.   Accessories matter

Even the prettiest dorm room will lack soul if you don't add enticing little extras. Accessories compel the viewer to examine the item more closely and wonder about its history. Don't be afraid to go bold with color and pattern, yet make sure your selection of each object comes straight from the heart. You could decorate college apartment with flea-market finds, patterned pillows, framed photos, and elegant bookshelves - there's a lot more to dorm life than just having the basics. It's time to embrace the joy of adding some finishing touches.

Wrapping Up

From adding eye-catching, bold colors to opting for unique twists with painted florals, experimenting is your secret tool for upping your dorm room's feel-good factor. Before you start, dive deep within yourself to discover what you truly enjoy and what triggers your relaxation. The design of your dorm room should help you heal.

***

Merissa Moore is an interior designer and blogger. Her exceptional interior design skills have left a wide range of clients happy with homes that are truly one-of-a-kind. In her spare time, Merissa writes how-to blogs on various topics, including home decor, art, technology, and more. Readers continue to praise Merissa's blogs for their insightful and helpful content.

Want To Install Solar Panels? Here Are Some Helpful Tips

RH Business Marketing Solutions

As the cost of energy continues to rise, more and more people are looking for ways to reduce their monthly expenses. One option that is becoming increasingly popular is solar panels. Solar panels allow you to generate your electricity, which can help you save money on your energy costs.

If you're thinking about installing solar panels, here are several helpful tips to get you started.

Do Some Research

Before you invest in solar panels, you'll need to make sure that your home is a good candidate for them. Solar panels work best when they're placed in an area that receives direct sunlight for most of the day. If your home doesn't get a lot of Sun, you may want to consider other renewable energy options.

On the other hand, there are different types of panels and you should consider what will work best for your needs. You can see here what solar options are there and what is the average solar panel cost for each type and the additional equipment. Don't forget that the initial solar feature cost is only a fraction of what you'll save in the long run.

Get an Energy Audit

An energy audit will help you determine how much energy your home uses daily. This information is important because it will help you determine how many solar panels you'll need to generate enough power for your home. Many utility companies offer energy audits, or you can hire a professional to do one for you.

Additionally, an energy audit will also help you identify areas where you can improve your home's energy efficiency. Making some simple changes, like sealing drafts and installing energy-efficient appliances, can help you reduce your energy consumption. As a result, you may be able to get by with fewer solar panels.

Calculate the Cost

Once you've determined how many solar panels you'll need, you can start to calculate the cost of installing them. The cost of solar panels has come down significantly in recent years, making them more affordable than ever. In addition, there are several financial incentives available that can help offset the cost of installing solar panels.

For instance, many states offer tax credits for installing solar panels. The federal government also offers a tax credit of up to 30 percent of the cost of installing solar panels. These incentives can make a big difference in the overall cost of going solar.

Get Multiple Quotes

When you're ready to start shopping for solar panels, it's important to get multiple quotes. The cost of solar panels can vary significantly from one company to the next. As such, it's important to compare prices before making a final decision.

You can get multiple quotes easily by using an online quoting tool. Simply enter some basic information about your project, and you'll receive multiple quotes from different companies. This is a great way to ensure that you're getting the best possible price on solar panels.

Hire a Professional

Installing solar panels is not a do-it-yourself project. Unless you have experience working with electrical systems, it's best to leave the installation to a professional. Solar panel installers are trained and experienced in installing these systems, so they can get the job done quickly and efficiently.

Additionally, a professional installer will be able to help you take advantage of any available incentives. They can also help you troubleshoot any problems that may arise during or after the installation process.

For example, if your panels are not generating as much power as you expected, a professional can help you figure out the problem. Or, if you have questions about how to maintain your solar panels, a professional can offer advice.

The Optimal Time to Go Solar

There is no perfect time to install solar panels. However, there are a few things you should keep in mind when deciding when to make the switch. If you're planning on selling your home soon, it may not make sense to install solar panels because it can take several years to recoup your investment. However, in one moment, this can increase the value of your home by a considerable amount.

On the other hand, if you're planning on staying in your home for the long haul, solar panels can provide years of savings. Additionally, if you live in an area with high electricity rates, going solar can save you a significant amount of money each month.

Installing solar panels is a big investment, but the cost has come down significantly in recent years. There are several financial incentives available that can help offset the cost, making solar panels more affordable than ever. If you're thinking about going solar, be sure to follow these six helpful tips.

Blocked Drain Cleaning Service Providers Use Sophisticated Equipment And Materials

RH Business Marketing Solutions

Have you wanted know-how experts, such as drain cleaning services, to get lubricant and liquid waste out of drainage pipes so they do not become jammed or blocked? Some may believe it is magic, but it is simply expert skills and coaching. To complete the cleanup, these experts of blocked drain cleaning service providers employ useful tips and modern equipment.

The primary drain cleaning technique is done using large trucks to remove all of the sewer's dirt so it can work correctly. With technological innovation, there are many new machines and tools currently available. These toolkits aid in making the job more effective and in saving time.

Benefits Of Hiring A Professional Drain Cleaning Service Provider

  • Saves Time 

Innovative tools and machinery help save time and make the job more useful. Previously, a blocked drain cleaning service provider would have to spend hours cleaning the drain due to the utter lack of these techniques. They also relied on manual labourers to complete the task. So, the outcome was not effective. Even so, the cleaning had not been done properly. This meant that the drain would soon clog. As a result, one had to spend a lot more money on these items.

  • Disease Prevention Through Contact

Hitherto, because sophisticated equipment and tools were unavailable, a blocked drain cleaning service provider would have to get manual work involved, which became the root cause of several diseases. But, over a period of time, these services evolved, and with the assistance of new tools, it has become easier to clean blocked drains. 

Finest Drain Cleaning Companies

Drains are an essential component of your drainage system, and while they are built to transport only fluids, we all understand that much more can transfer through them, from wasted food in kitchen appliances to hair in bathrooms. When problems occur, picking the best drain cleaning service will ensure that your sewage system can transport all sewage water from your land.

The finest blocked drain cleaning service providers offer emergency workers, equipment, and supplies to manage any blockage, as well as their workers who undertake the tasks.

Important Things To Keep In Mind When Selecting A Drain Cleaning Service 

You must be prepared in advance to take the time to look for when trying to contact and employ a drain cleaning service. 

Qualifications And Expertise

For drain maintenance, licensed businesses hire skilled and knowledgeable plumbers. This aids in the valid documentation and correction of the issue. Unpracticed drain cleaning service providers struggle to correctly define the problem. When looking for drain cleaning services, ensure the team has the necessary certifications and licencing. Untrained plumbers can cause serious damage to your pipes, exacerbating the situation.

Innovation

Most drain cleaning services now rely on innovation to successfully clean your drain blockage. Distinctive features are no longer used to pinpoint the source of drain leakage. Contract workers now use special cameras in drainages to know the exact location and size of clogs. It is much easier to fill a blockage once you have determined its location and size.

Some businesses also use elevated water to clean the pipes. The said chemical-free hydro water jet innovation is especially efficient for drain opening and safe for the pipes. Choose a drain cleaning service that relies on innovation for a more efficient and long-lasting remedy to your issue.

Customer Support 

Your first contact with a drain cleaning service provider would be over the phone or via their webpage. What makes a difference most when selecting a drain cleaning service is how people respond to your inquiry over the mobile or via their website.

How your question was handled over the phone or on the website gives you a good idea of a company's professionalism and customer service. A decent company will react favourably and promptly. They will make appropriate suggestions and send a suitable plumbing team to your home. They may also provide free quotes. Companies that provide poor service will keep your calls on hold for extended periods. They may react badly or not react at all. 

Recognition

Drain cleaners' reputation is the main determinant of their service. Inquire with your family and friends about the drain cleaning company they used the last time they had this problem. You will almost certainly get some good recommendations.

Emergency Response

Because a blocked drain is a water damage scenario, you should look for a drain cleaning service in the area that offers 24-hour service. You wouldn't want to wait days for anyone to come out and solve your blocked-up toilet.

Next time you drain pipes, remember that the finest blocked drain cleaning service provider must meet the above criteria.

Guest Contributor: Nivi Watson

HOME REMODELING TIPS: 6 DECOR IDEAS THAT ADD VALUE TO YOUR PROPERTY

RH Business Marketing Solutions

Are you in the market for some home remodeling tips? If so, you're in luck! In this blog post, we will discuss six decor ideas that can add value to your property. There are many different things you can do to add value to your property. Whether you're looking to improve your lighting, curb appeal, or walls, we have you covered! Keep reading for a closer look at each of these ideas.

INDOOR FOUNTAIN

One of the most popular home remodeling ideas is to add an indoor fountain. Indoor fountains can add both style and value to your property. They are also relatively easy to install and maintain, making them a great option for those who are looking for a low-maintenance way to improve their home. By installing a large indoor fountain, you can create a focal point in your home that will impress guests and increase the value of your property. There are many different styles of indoor fountains available, so you can find one that fits your personal style. When it comes to adding value to your home, an indoor fountain is a great option!

LIGHTING IMPROVEMENTS

Another popular home remodeling idea is to improve your lighting. This can be anything from installing new light fixtures to adding more light bulbs throughout your home. There are many different ways you can do this, but one of the most effective is to install energy-efficient LED lights. These lights use less energy than traditional incandescent bulbs, so they'll save you money on your energy bill each month. They also last longer than traditional bulbs, so you won't have to replace them as often. Improving your lighting is a great way to add value to your property and save money at the same time! Good lighting can make a big difference in the overall look and feel of your property. Poor lighting can make a space feel smaller and less inviting. If you're not sure where to start, we recommend hiring a professional to help you determine which changes would be most beneficial for your home.

CURB APPEAL IMPROVEMENTS

If you're looking to improve the curb appeal of your property, there are a few things you can do. One option is to pressure wash your driveway and sidewalks. This will instantly make your property look cleaner and more inviting. Another option is to paint your front door. This is a quick and easy way to add some color and personality to your property. If you're looking for a more permanent solution, you can always install new landscaping. This will definitely make a big difference in the overall look of your property. No matter what you decide to do, improving your curb appeal is a great way to add value to your home.

FIREPLACE

One of the best ways to add value to your home is by installing a fireplace. Fireplaces are not only stylish, but also provide warmth and comfort on those cold winter nights. There are many different styles of fireplaces available, so you can find one that fits your personal style. If you're not sure how to install a fireplace, we recommend hiring a professional. This is definitely a project that you don't want to do yourself! Installing a fireplace is a great way to add value to your property and make your home more comfortable.

REPAINT YOUR WALLS

If you're looking for an easy way to add value to your property, repainting your walls is a great option. This is a quick and easy project that can be done in just a few days. When it comes to choosing paint colors, we recommend going with neutral colors. Some popular neutral paint colors include beige, ivory, and gray. These are colors that will appeal to buyers and won't turn them off when they walk into your home. Repainting your walls is an inexpensive way to add value to your property and make it more appealing to buyers. If you want a more unique look, you can always add accent walls. This is a great way to add some personality to your property without breaking the bank.

LANDSCAPING

One of the best ways to improve your property value is by improving your landscaping. This can be anything from planting new flowers to installing a new irrigation system. No matter what you decide to do, adding some color and life to your landscaping will definitely make a difference. If you're not sure where to start, we recommend hiring a professional landscape designer. They will be able to help you create a plan that fits your budget and improves the overall look of your property. Improving your landscaping is a great way to add value to your home and make it more appealing to buyers. 

When it comes to finding a landscape designer, it's important to do your research. There are many different designers out there, so you want to find one that is reputable and has a lot of experience. One option is to ask your friends and family for recommendations. Chances are, they know of a few good designers that you can check out. Once you've narrowed down your options, it's important to meet with the designers and get a feel for their style. You want to find someone who shares your vision and can help you bring your ideas to life. It's also important to ask the designer about their experience with similar projects. This will give you a better idea of what you can expect from them.

Installing a fireplace, repainting your walls, and improving your landscaping are all great ways to add value to your home. These are all quick and easy projects that can be done in just a few days. If you're not sure where to start, we recommend hiring a professional. They will be able to help you create a plan that fits your budget and improves the overall look of your property. Improving your curb appeal is a great way to make your home more appealing to buyers and increase its value. No matter what you choose to do, making some simple improvements to your home can go a long way in adding value to your property. We hope this article was helpful.

Sewer vs. Septic: Which Is Better For Your Plumbing?

RH Business Marketing Solutions

Plumbing is a crucial part of your home, providing vital water and waste removal. You want your system to last long, and any required maintenance should be done promptly. But one of the most common questions for homeowners is which type of plumbing system they should have, sewer or septic? This article will help you determine which system is best for your family.


What is a Septic Tank?

A septic tank system is a way of treating wastewater that flows through your home, including the toilet and sinks. It consists of a tank of concrete or other heavy materials into which the wastewater flows. The tank can be up to 2 feet underground. The wastewater flows into an outflow pipe and then into the soil to be broken down and absorbed. The most common brand of septic tank system is called a "tank and field" system. This system includes an underground tank with a separate field where bacteria break down the waste in the soil, so it can be removed without returning to your home. The tanks are also known as "septic vaults."


What is a Sewer?

A sewer system is just like it sounds. It is a system of pipes that carry wastewater to a separate location. In some cases, these systems are connected to homes, but for the most part, they are located in a specific area near your home. Sewers will often lead to a treatment center or a wastewater facility where the water can be treated before disposal into lakes and streams. The water treatment in this way removes hazardous chemicals and prevents raw sewage from backing up into your home or creating hazards downstream.


What Kind of Circumstances are Best for Septic

When you have a septic system, you must consider where to place the tank. You must ensure that the soil is porous enough and not frozen because the bacteria used to break down the waste in a septic system need soil to do its job. Because of this, it is best if you can place your septic tank on your lawn or somewhere other than a driveway or concrete surface. This is also a critical consideration when you are building a house.


You must also consider the materials from which the septic tank is made. Plastic tanks cannot be used in areas with high water tables because of the risk of the system overflowing and causing a leak into your home. Steel tanks are better for this kind of application, as they can handle much more force than plastic, which can cause problems if the tank ever gets bent or damaged. If you are building a house, you might also want to consider a concrete tank. These are very strong and can handle all kinds of weather, though they are much more expensive than other materials.


What Kind of Circumstances are Best for Sewers

There are several different kinds of sewer systems, which include "sanitary sewers," "combined sewers," and "storm sewers." Each of these has its own set of conditions and limitations. Sanitary sewers carry only household wastewater from homes and commercial buildings and lead to a treatment plant. Combined sewers carry both sanitary wastewater and stormwater runoff, like rain storms. Again, they lead to a treatment plant. Storm sewers carry only stormwater. These are often combined with sanitary sewers in large cities and towns but not in rural areas. Again, they lead to a treatment plant.


Because of the chemical nature of household wastewater, there are specific locations where sewers cannot be installed. For example, they cannot be placed under gravel or on steeply sloped land because wastewater will back into your home if it has nowhere else to go. Homeowners should also think about what kind of climate they are living in. If you live somewhere that is prone to flooding; your sewer system will have to be able to withstand the high water levels and strong winds that can cause damage.


Is One Better Than the Other in General?

Neither one of these systems is better than the other in general. It all comes down to your specific needs and how you want to live. An environmentally friendly choice would be a septic tank. At the same time, a more urban family might prefer having their wastewater treated at a treatment facility instead of on their land. If you have the option of both systems, it is always a good idea to install both to have backups in case one system fails. You may also want to consider how you dispose of your wastewater articles. A septic system will allow you to do that, while a sewer system might mean that your wastewater must be treated before being sent into the water table.


Finally, if you are building a new home, it is best to install either system for both aesthetic and environmental reasons. This can be done in conjunction with a landscaping plan that features plants known to break down the chemicals and toxins in your wastewater. These plants will help keep the water clean so that it can easily be absorbed into the ground instead of running off your land and causing problems for ecosystems downstream.


Conclusion

Choosing between a septic tank and sewer system is often a difficult decision. Each of these systems has its advantages, disadvantages, and deterrents. If you look at your location, the climate in which you live, your water table level, and other factors, you can decide which system will work best for you and your family. You should always consider your options and ask yourself what you want to do with your wastewater, how you want to dispose of it, and how you want to treat it.

Written by Taylor Thompson, a digital PR Specialist representing ADB Septic.

How to fix a clogged pool pipe

RH Business Marketing Solutions

If you have a swimming pool, then you know that keeping it clean is essential. One of the most important parts of maintaining your pool is making sure the pipes are clear and free of debris. If your pool's pipes become clogged, it can be difficult to keep the water clean and flowing properly. In this article, we will discuss how to fix a clogged pool pipe.

Clean the pool more often

The best way to avoid a clogged pool pipe is to clean the pool more often. This will help to remove any debris or dirt that could potentially cause a blockage in the pipes. Not to mention, fewer blockages reduce the chances of a burst pipe.  Be sure to vacuum the pool regularly and brush the walls and floor to remove any build-up of dirt. You should also empty the skimmer basket on a regular basis. This will help to keep the water flowing freely and prevent any blockages from forming. But let’s say that you are already there and your pool pipe is clogged. This is how you can go over fixing it.

Identify the blockage

If you notice that your pool isn't draining properly, or if the water is cloudy or murky, then you may have a clogged pipe. You can identify a clogged pipe by checking the water flow. If the water is flowing slowly or not at all, then there is likely a blockage somewhere in the pipe.

Another way to identify a clogged pipe is to look for signs of drainage on the ground around your pool. If the water is draining slowly or not at all, you may see evidence of this on the ground near your pool. Pool drainage can create wet spots on the ground, as well as pools of water that won't evaporate.

Turn off the pool circuit breaker

If you have determined that your pool's pipes are clogged, the next step is to turn off the pool circuit breaker. This will shut off the power to the pump, which will help to clear the blockage.

Once you have turned off the circuit breaker, you can begin to clear the clog. There are a few different ways to do this, but one of the most common methods is to use a plunger.

Once the clog has been cleared, turn on the pool circuit breaker and test the water flow. If everything is working properly, you can start using the pool again without worries.

Try a plunger

If you suspect that your pool's pipes are clogged, the first thing you should try is using a plunger. This is a simple and easy way to try to clear any blockages in the pipes. Just place the plunger over the drain hole and push and pull it up and down until the obstruction clears.

If the clog is further down in the pipe, you may need to use a longer plunger extension. This will allow you to reach further down into the pipe and clear any blockages.

Use a drain snake

If the plunger doesn't work, or if you can't reach the clog with a plunger, then you may need to use a drain snake. A drain snake is a long, flexible tool that can be inserted into the pipe to clear any obstructions.

To use a drain snake, insert the tip of the tool into the pipe and push it through until you feel resistance. Once you feel resistance, start twisting the tool in a clockwise motion. This will help to loosen any blockages in the pipe. Continue twisting and pushing the tool until the obstruction is cleared.

Redo the pipes

If clearing the clog doesn't seem possible, you might want to consider replacing some of your pool's pipes. This is a more drastic measure, but it may be necessary if the clog is severe. You can replace the pipes yourself, or you can hire a professional to do it for you. Either way, this is a big job and it will likely take some time to complete. Keep in mind that professional pool renovation would be a better idea, as contractors know how to install pipes more effectively, and they can give you guidelines for keeping them unclogged.

Conclusion

Clogged pool pipes can be a pain, but fortunately, there are a few ways to fix them. Just remember to turn off the pool circuit breaker before you start any work on the pipes. And if all else fails, you can always replace the pipes altogether.

Guest Contributor: Tim Tylor

7 Easy Ways to Save Water This Summer

RH Business Marketing Solutions

Summer often comes with periods of prolonged drought. All over the US, there are long periods of drought every summer, which can lead to all sorts of issues. A lot of these problems are caused by wasting a lot of water during summer. Fortunately, however, there are ways for most households to stave off the drought, at least for a while. If you’re careful, you can minimize the amount of water you use during the summer. In order to help you do this, we have put together a list of 7 ways to save water this summer, which will hopefully help you avoid the drought.

1. Water your yard during the morning or evening

Grassy lawns are something everyone enjoys; a well-maintained lawn is both pleasing to the eye and good for curb appeal. However, watering a yard takes a lot of water in the long run, and water evaporates rather quickly in the summer. So, in order to make the most of your water, you should only water your yard when it’s colder. During the morning and evening, when temperatures are pleasantly cool, water evaporates much more slowly. As such, you can get away with watering your yard less often because you will utilize the water as much as possible. However, you shouldn’t forget about the things every house needs to regularly check. Saving water is important, but you shouldn’t forget about maintenance.

Watering your yard when temperatures are lower will make the water evaporate more slowly.

2. Check if your toilet is leaking

A leaky toilet can potentially waste up to 100 gallons of water every day. And the worst part about it is that it’s very hard to spot a leaky toilet. However, a proactive method lets you check if your toilet is leaking quite easily. Simply take some food coloring and put a few drops into your toilet tank. If the color shows up in the toilet bowl, then you have a leak. A toilet leak is fairly inexpensive to fix, but the amount of water it can waste when ignored is serious. Also, experts from allstatemoving.net note that if you move into a new home this summer, checking for water leaks is the first thing you want to do.

3. Shorten your showers

Shaving off only two minutes off your shaver can save you 1,750 gallons of water every year per person. Two minutes might not seem much, but the amount of water that streams out of a shower head every second can be quite surprising. Additionally, consider turning the water off while you soap or shave for the same reason. In the long run, these small acts add up to saving quite a lot of water. Because of this, they’re a very good habit to have. While they’re definitely not as important as trying to ensure your air quality is good, they are some of the easiest ways to save water this summer.

Shortening your showers can save you quite a lot of water in the long run.

4. Use a dishwasher

Dishwashers are a wonderful creation that saves both time and water. Handwashing potentially takes up to 27 gallons of water, depending on how many dishes are washed. Comparatively, a typical dishwasher only spends 3 gallons of water when cleaning a considerable number of dishes. All in all, a dishwasher is an incredibly good investment, especially if you struggle with water use during the summer. Additionally, using a dishwasher will save you a lot of time. When handwashing dishes, you, of course, are busy the entire time. On the other hand, using a dishwasher only needs you to place the dishes inside, put the required cleaning supplies in, and let it do its thing while you do something else.

5. Cover your pool

If you’re someone who has a pool in their yard, then consider covering it while it’s not being used. By doing this, you make sure that the water in the pool stays in the pool instead of evaporating. Needless to say, it takes a lot of water to fill up a pool. As such, keeping the water where it is should be a priority. Additionally, if you’re planning on selling your home this summer, then adding a pool is a great way to get more value out of it. Of course, it’s an expensive investment, but this can add value to your home before it’s sold. Also, pools are one of the pre-sale home improvements with the highest return on investment.

By covering your pool, you can make sure to save water this summer.

6. Take your car to the car wash

Much like watering your yard, washing your car takes a lot of time and water. On average, washing a car takes up to 100 gallons of water, not to mention the time and effort. Commercial car washes, on the other hand, only spend up to 40 gallons of water and are significantly faster. So, not only would you be helping the community by spending less water, but you’d also save yourself a lot of time.

7. Get a rain barrel

Getting a barrel and placing it under your gutter’s downspout is a great way to save some water when it rains. Of course, this water shouldn’t be used to drink or wash something in the house, but you can use it to water plants. If you have a garden, this is a wonderful way to use rainwater. However, this does also bring up a point of why disinfecting and sanitizing your home is important. Using rainwater is a good idea, but this water is also unsafe. Keeping your home clean is a very important part of being a homeowner.

7 easy ways to save water this summer – conclusion

Summer can be a difficult time because it almost always brings droughts with it. As such, knowing how to save water where you can is incredibly important. Whether it’s simply shortening your showers or being more effective with how you use water in general, there are many ways you can use to try and stave off the drought for a little bit longer. We hope this list of 7 ways to save water this summer helps you avoid the issues which usually come with a drought, and we wish you a great rest of your day.

Guest Contributor: Sophia Perry

Everything You Need To Know About Condo Remodeling

RH Business Marketing Solutions

There are many benefits to condo living, such as the added security of living in a close community of neighbors, the use of amenities, and far less maintenance than single-family homes.

When it comes to condo renovations, however, there are more rules and regulations to adhere to than with a single-family home. So before embarking on condo renovations, it's essential to do your homework. Here are some of the most important factors to consider when planning a condo renovation.

Understand your HOA rules

The first place to start is to gain a clear understanding of what items within your condominium are considered yours, and which are considered to be common property under the rules of the HOA (Homeowner's Association). 

As Darren Robertson from Northern Virginia Home Pro states, “When buying a condo, you become legally bound to follow the rules set out by the HOA's Covenants, Conditions & Restrictions. It's imperative to familiarize yourself with these rules to ensure that the conditions are ones that you are comfortable living by and complying with.”

Covenants, Conditions & Restrictions (CC&Rs) typically go into great detail when it comes to defining which property elements are solely the condominium owner's and which are considered common property. Once you are familiar with which property elements are yours to do as you please, it can help inform your decision on whether to renovate. 

For example, suppose you want to replace your unit's windows and get your heart set on a particular design, only to discover that any replacements must match the exterior aesthetic of the other windows in the complex? Even though windows are quite possibly your responsibility to maintain, there may still be rules in place that prevent you from veering away from the current design. 

Depending on how strict your HOA's rules are, there may be too many restrictions to warrant any large-scale renovation ideas, so it's imperative to check these first. 

Get everything in writing

Because failing to adhere to your HOA's CC&Rs can result in penalties and fines, it's essential that you get all approvals in writing before commencing work. Verbal go-aheads likely won't suffice if the board deems that you have pushed ahead with renovations without the proper approval. 

Schedule carefully 

Your HOA's CC&Rs should also outline the days and hours you are allowed to carry out renovations, which you must stick to. In addition, there may be restrictions on when you can bring construction materials into the building, particularly regarding the use of elevators and the availability of parking for contractors. 

Ultimately, the HOA is responsible for ensuring that a comfortable standard of living is maintained for all residents, so it is strongly advised to adhere to these rules diligently to avoid disagreement or penalty. 

When scheduling renovations in line with HOA regulations, it's also worth noting that you will likely need to exercise patience. For example, some boards may only meet once a month, so approvals for plans and renovation revisions may take longer than is ideal. Be sure to consider this when liaising with contractors. 

Ask for advice

Because condo modeling is a more complex process, it can help to ask for advice from those in the know. It may help to chat with any neighbors in the complex who have renovated their condo - ask for tips and advice, as well as contractor recommendations. Contractors whose work can be vouched for is invaluable as it is, but if they are already familiar with carrying out remodeling works in your building, all the better. 

That said, always carry out your own due diligence regarding the rules and what the common elements are. 

Work with a third party

If possible, consider working with a designer or tradesperson who can oversee the project. Not only will this make the project run more smoothly, but it will also help avoid materials turning up at random times, stacked outside, and generally causing chaos. Given the challenges of carrying out a renovation in a condominium complex, it pays to have the project carefully coordinated by one third-party contractor. 

Lowering your lighting

Many condominiums have cement ceilings, meaning that you won't be able to make any changes that require drilling into them. 

This can make moving fixtures tricky, but there is a solution. Many condo remodels incorporate dropped ceilings to allow for new components to be installed. Adding dropped ceiling panels will enable you to add or move recessed lighting fixtures and make other changes, such as installing a new hood fan. 

Final thoughts

Condo renovations can be stressful and complicated, so it really does pay to be as organized as possible, both in advance and throughout the project. First and foremost, know your HOA rules, get advice, plan and plan some more, exercise patience, and, if at all possible, arrange to stay somewhere else while the work is being done.

10 Tips for Not Overrunning Your AC

RH Business Marketing Solutions

Introduction 

Keeping your air conditioner running efficiently doesn't have to be hard. If you follow a few basic tips and tricks, you can do a lot to prevent overrunning. Here are ten tips for not overrunning your AC. 

1. Clean the Filters 

Clearing out your AC's filters is important to ensure the system's efficiency. After a few months of use, your filter might get dirty and clogged with debris. This can cause the filter to stop working properly, which means that your system won't be able to cool you down as effectively. 

If you notice that your AC is running more slowly or isn't keeping the same temperature in your home, look inside the unit for any visible signs of filth. Cleaning the filters will help keep your house from getting too hot during summer. 

2. Turn It Off When Not Using 

You don't want to overuse your AC, and you'll save money on electricity if it's not running when you're not using it. You can turn it off when you leave the house or set a timer to shut it off after a certain amount. 

3. Use ceiling fans 

If you have an AC unit that runs 24/7, check the temperature of your house every hour or so. If it's too cold inside or too warm, turn on your AC fan and adjust the temperature until you find the sweet spot. You can also use ceiling fans to circulate cool air throughout your home at night when you're sleeping. 

4. Insulate your ductwork 

The most common cause of overheating in a house is using too much air conditioner for an inadequate home. Insulating your ductwork will help keep your AC from running too long. 

Insulation can be a great way to reduce your AC's energy consumption. Insulation is a way to reduce the amount of heat that is lost from your ductwork, keeping your AC working at full capacity. 

Keep in mind that insulation material must be applied over the ductwork. If you're insulating it, you may want to consider using an existing surface, such as tar paper or cardboard. 

5. Keep Your Room Shady 

Keeping your room shady is one of the best ways to keep your AC running at maximum efficiency. Anything that reduces the amount of sunlight entering your home will help keep your AC from overworking and causing damage to itself. 

6. Use a Smart Thermostat

A smart thermostat is a great way to keep your AC running at the right temperature, even when you're away from home. Smart thermostats can also help save energy by adjusting your AC as needed—they know when you're home and adjust accordingly. 

7. Keep the Room Tightly Closed 

The room should be tightly closed, and the door should be shut during the entire operation. 

Do not open the door more than once every 5 minutes. 

When you close the door and turn off the AC, ensure it is tightly closed. If it is not, then air will escape from inside the room. 

8. Clean the Vents of the Air Conditioner 

It's important to clean the vents of your air conditioner regularly to make sure that the air is cool and fresh. A clogged air conditioner can lead to many problems, including overheating and uncomfortable temperatures. You can use a small brush or something similar to clean these vents, but be careful not to damage them. 

9. Perform Regular Maintenance 

A common problem with ACs is that they can be prone to running too long. This can happen if you don't perform regular maintenance on your system. 

Regular maintenance is the most important thing you can do to keep your AC running smoothly. You should check the following: 

• Check the filters regularly and clean them if needed 

• Check for any leaks in your system 

• Check for damage to the unit itself 

10. Check the fan blade for wear and tear 

The fan blade will likely wear if your AC runs over its temperature. Check for wear and tear by turning the unit off. Next, remove the cover plate and look for obvious wear on the fan blades. If you find any problems, contact a technician immediately to have your unit repaired. 

The temperature one should set their thermostat during the day to conserve energy Most people set their thermostats to 75 degrees during the day, but that doesn't mean this energy-efficient temperature is right for you. 

How to check your FREON level 

FREON level checking is simple. With a simple meter, you can check your system to determine if it needs to be topped up or refilled. 

Conclusion 

So keep in mind, just like the brakes on your car, you will have to keep up with the maintenance on your HVAC system. This includes keeping your air filters cleaned out and having them

replaced on a regular schedule. Just as everyone likes to drive well-taken care of cars, it is easy to tell when a home or business isn't properly maintaining its HVAC system. So don't let yourself or your clients fall victim to this uncomfortable problem by maintaining your system. 

Written by Paige Shackelford, Digital PR Specialist for Open Sesame Garage Doors

Invisible Mold Can Destroy Architecture Silently: How To Treat Mold In Buildings

RH Business Marketing Solutions

Mold can cause serious problems in a home and lead to expensive remediation costs for homeowners. It can grow anywhere in your home, especially if there is moisture or organic matter to grow on.

The condition of your house will be worsened if the mold is invisible, which can destroy your house silently. Invisible mold can quickly multiply and cause health issues such as nasal congestion, chronic headaches, and allergies, apart from destroying your house. 

The good thing is that you can treat mold in your building by employing some simple measures. For your help, we will let you know how to explore and deal with invisible mold in this context.

How To Identify Invisible Mold In The Basement?

Finding the invisible mold will be challenging if you don't have any previous experience. Invisible mold usually grows in the house’s basement. In that case, following some simple techniques will help to find the invisible mold. The techniques are as follows:

Smell The Air For Mold

The smell is the first sign to find out whether your  basement has mold. So, if you experience any musty, dusty, or earthy smell in your basement, there could be mold growing. Besides, wet wood or dirty socks smell also indicate that your basement has mold.

Explore The Mold Area

If you find any suspicious odor in your basement, locate the mold area. In that case, you can inspect sewage pipes, water supply lines, and water drainage pipes. Additionally, look to the ceiling above the finished basement, around the sump pumps, and cavities inside the wall to find the mold-affected area.

Visually Locate The Mold 

Look for signs of mold through a light. At this stage, inspect any spots, whether your surface has black mold or dust. Both of these are common household allergens, but black mold can cause damage to your house. Ordinary people may not be able to identify between black mold and dust. So, you should have a good idea about black mold vs dust to identify the grown mold on your house. 

Verify The Mold With Bleach

If you get anything that seems to mold, you can check the area by making a solution. To make the solution, add 1 cup bleach with 10 cups of water in a container. Then apply the solution to the suspected area. If the applied area doesn't change the color, it would be a normal dirty surface. If it is moldy, the area will be lightened.

Things You Will Need To Treat Mold In Your Buildings

If you wish to treat mold in your building, you will need some instruments and ingredients to make the task easier. Here we have listed these needed instruments and ingredients for your help.

  • Bucket

  • Liquid dishwashing detergent

  • Chlorine bleach 

  • Soft, non-abrasive sponges 

  • Container

  • Contractor’s heavy-duty garbage bags 

  • Measuring cup

  • Hard and soft bristle brush

  • Garden hose

How To Treat Mold In Buildings

After arranging all the instruments and ingredients, you can start the process of treating mold in your house. Here, we have explained how you can treat mold in your house. 

Remove Invisible Mold From The Basement

Bleach is usually a strong acid that can destroy wood and even concrete. That means you can’t use bleaching solutions on your foundations, especially in your house’s basement. According to the EPS, mold cleanup shouldn't involve bleach as a routine practice. In such cases, a vinegar solution can be a better option to treat the mold-affected areas. Studies found that vinegar contains antibacterial and antifungal properties that can be used for mold treatment. To treat mold in your basement, check out the steps below. 

  • Ventilate the room with a fan so that the airflow moves toward the outside. Tape around the work area and turn off the HVAC system to avoid mold spreading.

  • Dry the place by increasing the heat of the room. Keep running the fan until the room is completely dry.

  • Make a solution with vinegar and water and spray down the areas of basement mold.

  • Rub the surface where the solution is applied with a soft sponge. 

  • Once the mold has dried, clean the surface physically so that there is no mold remaining on the surface. 

Remove Mold from Interior Walls

When working with mold on your interior walls, you should wear safety glasses and get respiratory protection. Check out the steps below to remove mold from your house’s interior walls.

  • First, make a solution with detergent, bleach, and water, following the ratio of 1:10:20. To clean off mold from your walls, this mixer will help to adhere to the poured area.

  • Spread the solution with a sponge over the mold-affected area. Try not to over-saturate the surfaces and toss sponges after use.

  • Let the solution air-dry completely before making any required repairs. So, don’t wash away the applied solution. 

  • Now rub the entire mold area with the soft sponge for a few minutes until all the mold spots clear out.

  • After that, wash the wall with clean water and bag all disposed materials in a heavy-duty plastic bag.

Remove Mold From Exterior Home Surfaces

Chlorine bleach is a quite effective cleaner to remove mold from house siding, concrete, stone, and brick. However, use caution and put on a respirator, gloves, safety goggles, and protective gear. Check out the steps below to remove mold from your exterior surface with chlorine bleach.

  • Mix 1 cup of chlorine bleach to a gallon of water in a bucket.  

  • Wet the moldy spots with normal water using a sprayer or by hand, then spread the solution to the affected area using the sprayer. 

  • Scrub the area and re-apply the bleach and water mixture if any stains are still present.

  • Let the surface air dry completely and clean the areas with normal water.

Remove Mold From Tile and Grout

Humidity and soil on surfaces create a suitable environment for mold growth. For that reason, bathroom tiles and grout are more exposed to mold growth, especially in the shower stall area. Following the steps below you can easily clean the moldy tiles and grout.

  • Simply mix one cup of bleach with one gallon of water. 

  • Apply the made solution to the mold-affected area using a brush.

  • Give the solution at least 15 minutes to dry in the applied area.

  • Scrub or treat the affected area a second time, if needed.

  • Now, rinse the area with normal water and let the area air dry.

Why Does Mold Grow In House?

Mold can grow in your house for different reasons, but it needs some conditions to begin to grow. These conditions are as follows: 

  • Mold spores

  • A food source (e.g., wood, drywall, cotton)

  • Darkness (Under ultraviolet light, mold cannot grow)

  • Warmth (In freezing temperatures, mold cannot grow.)

  • Oxygen

  • Moisture (e.g. humidity, water leaks)

Moisture is the main cause of mold growth, but the other reasons on the list are also responsible for that. However, here we have discussed some common causes of mold growth in your house.

Humidity Causes Mold

If it's extremely humid outside for a few days, mold can start to form inside your house. This mainly happens for wet air when it rains for several days. 

Besides, if you live where the humidity in the air is naturally high, such as in coastal areas, mold growth can be a regular issue in your home. Interior humidity usually rises when moisture evaporates into the air.

Leaking Pipes Cause Mold

Water leakage from pipes is another prime cause of mold growth. The situation will be worse when the leaking pipes are undetected, like inside a wall. 

When you discover the leak, mold has already started growing. Besides, if water damages the ceiling, you will find mold growth in your home.

Condensation Cause Mold 

Condensation can form on cold surfaces in your home. Moisture in the air typically condenses when it comes into touch with cold surfaces like windows, mirrors, and walls. This leads to the growth of molds that appear as small black dot clouds on the surfaces.

Poor Ventilation Causes Mold

Poor ventilation can create pockets of stagnant moist air where mold thrives. Water evaporates in the air to create moisture inside the house, which needs to be carried out through the windows to balance the humidity level. If it can’t do that, the humidity will make the indoor walls wet, causing mold growth.

Conclusion

Mold is always harmful to any building as well as to health. If the mold remains invisible, the situation will be worsened. So, you should treat mold properly, even if your house builds mold. 

For your help, we have demonstrated a complete guideline about how to treat mold in your building, including invisible mold. 

Following the simple steps, you can easily deal with the grown mold in your house. However, if you cannot find the invisible mold, follow the instructions mentioned above. This will help you to specify the mold-affected area in your house.

Guest Contributor: Bernita Fregoso