Google+

contact us

Use the form on the right to contact us.

Day or Night, we are here to serve you. Leave your plumbing problem to us.


Tinley Park, IL

(708)845-7922

Residential and Commercial plumbers and plumbing contractors available in Orland Park, Tinley Park, Oak Lawn, Palos Heights, Midlothian, Oak Forest, Homer Glen, Mokena, Frankfort, and the surrounding Chicago South Suburbs. Emergency plumbers.

copper water lines.jpg

Kevin Szabo Jr Plumbing Blog

Kevin Szabo Jr Plumbing is Tinley Park, Orland Park, Oak Forest, Midlothian, Orland Hill, Homer Glen, Mokena, Frankfort, Crestwood, Palos Heights, Oak Lawn, local plumber. Read our blog for advice, tips, a good laugh, and basic home improvement.

**We are moving our old blog to our new and improved website. Too see all our posts visit kevinszabojrplumbing.blogspot.com

Filtering by Category: June 2024

Surviving the Heat Wave: 10 Essential HVAC Tips

RH Business Marketing Solutions

As temperatures soar and a heat wave settles in, keeping cool becomes a top priority for everyone. Your HVAC (Heating, Ventilation, and Air Conditioning) system becomes your best friend during these scorching days, but it needs a little extra attention to ensure it keeps you comfortable efficiently. Here are some crucial tips to maximize your HVAC system's effectiveness during a heat wave:

1. Regular Maintenance is Key: Before the heat wave hits, schedule a maintenance check-up for your HVAC system. A professional technician can inspect and clean the unit, ensuring it operates at peak efficiency. This not only improves cooling performance but also extends the lifespan of your system. Please give us a call if you are interested in HVAC maintenance, 708-845-7922.

2. Replace Air Filters: Clogged air filters restrict airflow, making your HVAC system work harder to cool your home. Check and replace filters regularly, especially during peak cooling seasons. This simple maintenance task can significantly improve your system’s efficiency and reduce energy costs.

3. Optimize Thermostat Settings: Set your thermostat to a consistent temperature that is comfortable yet energy-efficient. During the day when you're away, consider setting it a few degrees higher to save on cooling costs. Installing a programmable thermostat allows you to automate temperature adjustments based on your schedule.

4. Use Fans Wisely: Ceiling fans and portable fans can complement your HVAC system by circulating cool air more effectively throughout your home. Remember, fans cool people, not rooms, so turn them off when you leave the room to save energy.

5. Seal Leaks and Insulate: Prevent cool air from escaping by sealing leaks around windows, doors, and ductwork. Proper insulation in your home also helps maintain a consistent indoor temperature, reducing the workload on your HVAC system.

6. Keep Heat-Producing Appliances Away: Appliances like ovens, dryers, and even lights can generate heat and cause your HVAC system to work harder. Minimize their use during the hottest parts of the day to reduce the overall heat load in your home.

7. Close Blinds and Curtains: Direct sunlight can quickly heat up your home. Keep blinds and curtains closed during the day to block out the sun’s heat and reduce the need for additional cooling.

8. Consider Upgrading to Energy-Efficient Equipment: If your HVAC system is outdated or inefficient, upgrading to a newer, energy-efficient model can save you money in the long run. Look for systems with high SEER (Seasonal Energy Efficiency Ratio) ratings for optimal efficiency.

9. Use a Dehumidifier: High humidity levels can make your home feel hotter than it actually is. Use a dehumidifier to remove excess moisture from the air, making it easier for your HVAC system to cool your home effectively.

10. Stay Informed and Stay Hydrated: Lastly, stay informed about heat advisories and take necessary precautions to stay cool and hydrated. Drink plenty of water and avoid strenuous activities during the hottest parts of the day.

By following these HVAC tips during a heat wave, you can keep your home comfortable while minimizing energy consumption and utility costs. Remember, a well-maintained HVAC system not only keeps you cool but also contributes to a more sustainable environment. Stay cool and safe during the heat wave!

Buried In Stuff, Buried In Debt: The Shocking Cost Of Clutter

RH Business Marketing Solutions

We all have that drawer, that corner, that entire room overflowing with "stuff." But what if we told you that this clutter isn't just an eyesore – it's silently draining your wallet? From hidden storage fees to impulse purchases fueled by disorganization, clutter can have a significant impact on your finances.

The infographic below dives deep into the surprising ways clutter costs you money. Did you know that 11.1% of U.S. households rent additional storage space, a recurring expense that adds up quickly? And that's just the tip of the iceberg. Americans collectively spend a staggering $2.7 billion annually replacing lost items buried beneath the clutter. The stress and frustration caused by disorganization can even lead to health problems, potentially racking up medical bills.

But the financial impact goes beyond the obvious. Clutter can subtly influence your spending habits. Ever find yourself buying something you already own? Or maybe misplaced bills buried under a mountain of paper result in late fees. The stress of clutter can even cloud your judgment, leading to impulsive purchases you might otherwise avoid.

The accompany resource provides actionable steps to get you started like seeking help from professional junk removal companies in North Carolina (or wherever you may be located). Along with other helpful tips, it can help you find a place to start. Letting go of unwanted items can be liberating, and professional help can ensure the process is efficient and stress-free. So, are you ready to reclaim your space and your finances? Let's get decluttering!

Bring The Outdoors In: Natural Elements For A Tranquil Home

RH Business Marketing Solutions

Do you crave a home environment that reflects the peace and serenity of nature? You're not alone. In today's fast-paced world, there's a growing desire to connect with the natural world, even within the confines of our own homes. The good news is that you don't need a complete overhaul to achieve this – by incorporating natural elements into your décor, you can create a calming and rejuvenating space that fosters a sense of connection with the outdoors.


The journey towards a nature-inspired home doesn't have to be expensive. For instance, consider using pipes as distinctive shelving brackets or lighting fixtures to create an industrial vibe that celebrates raw materials. And don't underestimate the transformative power of texture. Layering textured rugs made of jute, sisal, or wool can add warmth and dimension to a space, while incorporating rustic furniture pieces crafted from natural materials like wood or iron can create a cozy and inviting atmosphere.


The resource below explores more design strategies to weave nature's beauty into your living space. From the timeless elegance of stone to the cozy comfort of natural fabrics, it unveils a treasure trove of ideas to inspire you. So, are you ready to transform your home into a haven of peace and tranquility? Get ready to embark on a journey that brings the serenity of the outdoors into your living space.

Package Panic: Protecting Yourself From Porch Pirates

RH Business Marketing Solutions

The convenience of online shopping comes with a growing concern – porch pirates. These modern-day marauders snatch packages and other deliveries left unattended on doorsteps, causing frustration and financial loss for millions of Americans. With the rise of online retail giants like Amazon, porch piracy has become a significant problem, with estimates suggesting over 23 million packages stolen annually.


One effective strategy is utilizing delivery lockers offered by retailers. These secure lockers allow you to pick up your packages at your convenience, eliminating the risk of them sitting on your porch for extended periods. Technology can also be your friend in the fight against porch piracy. Installing a security camera, particularly solar panel security cameras, can deter thieves and even capture footage to help identify culprits. Motion-activated lights serve a similar purpose, illuminating potential targets and making them less appealing to porch pirates.


The accompany resource provides more valuable insights into the psychology of porch pirates. Understanding how they operate empowers you to take preventative measures. For instance, they often target homes that appear unoccupied during the day, making them easy pickings. If you know you won't be home for a delivery, consider rerouting it to your workplace or a trusted neighbor who can hold onto it for you.


By implementing these strategies and understanding the behaviors of porch pirates, you can significantly reduce your risk of falling victim to these modern-day thieves. So, the next time you order something online, take a proactive approach to protecting your package. Don’t let your next order be a loss!

How Often Should You Change Your HVAC Filter?

RH Business Marketing Solutions

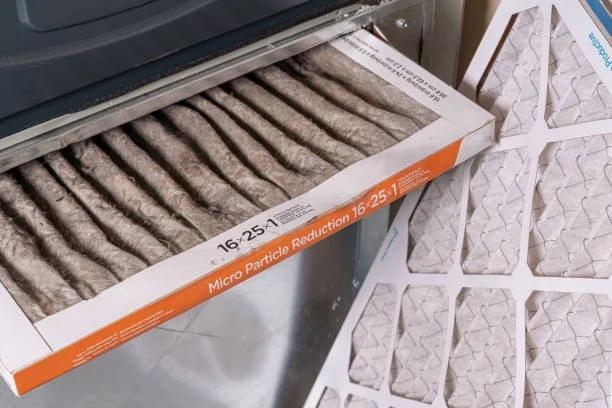
Maintaining the health and efficiency of your HVAC (Heating, Ventilation, and Air Conditioning) system is crucial for ensuring a comfortable indoor environment. One of the most important yet often overlooked components of HVAC maintenance is the regular air filter replacement. 

This article discusses how often you should change your HVAC filter, the factors influencing this schedule, and the potential impacts of neglecting this essential maintenance task.

Understanding the Role of HVAC Filters

HVAC filters are crucial in maintaining the cleanliness and efficiency of your home's air circulation system. These filters are engineered to capture and isolate airborne contaminants, including dust, pollen, pet dander, and other particulates. By trapping these pollutants, the filters can significantly enhance indoor air quality, making your home environment safer and more comfortable, particularly for those with allergies or respiratory issues. 

Additionally, filters can protect the HVAC system by preventing dust accumulation. Without a clean filter, accumulated dust can obstruct airflow and impair the system's efficiency, leading to increased energy consumption and reduced lifespan. This dual role of purification and protection is essential for your HVAC setup's optimal performance and durability.

Importance of Regular Filter Changes

Regularly changing your HVAC filter is vital for several reasons:

  • Enhanced Air Quality: A clean filter more effectively traps contaminants and allergens, which can be particularly beneficial for individuals with allergies or respiratory issues.

  • Energy Efficiency: A clogged filter forces the HVAC system to work harder, which can increase energy consumption and utility bills.

  • System Longevity: Clean filters can help prevent dust and dirt from building up in the system, thereby avoiding unnecessary strain on the HVAC components and extending the system's lifespan.

How Often Should You Change Your HVAC Filter?

The frequency at which you should change your HVAC filter depends on various factors, including the filter you use, indoor air quality, and living conditions. Here are general guidelines to help you determine a suitable filter replacement schedule:

Standard Disposable Filters

For basic 1-3 inch disposable filters, it is advisable to change them every 30 to 90 days. Changing the filter every three months may suffice if you reside in a less polluted area or use your HVAC system minimally. However, checking and possibly changing your filter monthly can help maintain optimal performance in high-use periods like summer and winter.

Enhanced Filters and High-Efficiency Particulate Air (HEPA) Filters

If your system uses high-efficiency filters, such as HEPA filters, they typically have a longer lifespan. Depending on usage, these filters can usually last between 6 to 12 months. Always consult the manufacturer's guidelines to determine the ideal replacement interval for these types of filters.

Factors That May Require More Frequent Changes

Some specific circumstances may necessitate more frequent filter changes, including:

  • High Occupancy: Homes with multiple occupants, and thus more foot traffic, may need to replace their filters more often.

  • Pets: Pet owners should consider replacing their filters every 60 days or more frequently if shedding is significant.

  • Allergies or Respiratory Conditions: For homes with allergy sufferers or individuals with respiratory conditions, more frequent changes can help manage symptoms by maintaining cleaner indoor air.

  • Construction or High Pollution Areas: Living in areas with high dust or undergoing home renovations can drastically reduce the effectiveness of a filter.

To assess your specific needs and improve your filter change schedule, consider taking an indoor air property quiz, which can provide personalized advice based on your home environment and lifestyle.

DIY Tips for Changing Your HVAC Filter

Changing your HVAC filter is a simple and essential task that can be done without professional help. Here’s how to ensure a smooth change:

  • Identify the Right Filter Size: Check your HVAC unit for the filter size, which is usually indicated on the old filter or the unit itself.

  • Purchase the Correct Replacement: Buy a filter that matches your HVAC system's size and quality requirements.

  • Power Off the System: Always turn off the system before changing the filter to avoid any safety issues.

  • Remove the Old Filter: Take out the old filter and dispose of it according to local regulations.

  • Insert the New Filter: Place the new filter in, ensuring it faces the correct direction (arrows on the filter frame should point towards the furnace or air handler).

Conclusion

Regularly changing the HVAC filter is a straightforward yet crucial part of home maintenance that significantly impacts the air quality and efficiency of your heating and cooling system. Adhering to the recommended filter change schedule, considering your specific living conditions, and responding to the needs of your household can lead to a healthier, more comfortable home environment. Remember, each home is unique, so it’s essential to adjust maintenance tasks to best suit your circumstances and ensure your HVAC system runs smoothly year-round.


Summer Season and Termites: Why Warm Weather Increases Termite Activity

RH Business Marketing Solutions

Summer brings warm weather, longer days, and more outdoor time. However, it also brings an increase in termite activity. Understanding why this happens and how to protect your property is crucial in maintaining a termite-free environment during the summer months.

If you’re still wondering why termites become more active during the summer and what you can do about it, let’s explore the reasons behind this seasonal surge and the steps you can take to safeguard your home.

Why Termites Thrive in Warm Weather

Termites are cold-blooded insects, so their activity levels are heavily influenced by temperature. Warm weather accelerates their metabolism, making them more active and hungry. During summer, the ground and air temperatures provide the perfect conditions for termites to thrive.

They become more aggressive in searching for food and expanding their colonies. But warmer temperatures are not the only factor. An increase in moisture levels can also be the cause. But why? Let’s have a look below.

Increased Moisture Levels

Summer often brings increased humidity and occasional rains, creating moist soil conditions ideal for termites. Termites need moisture to survive and build their colonies, and the combination of warmth and humidity creates a hospitable environment for them to flourish. This is why homeowners might notice more signs of termites during the summer.

Termites Affecting Properties

Termites can cause significant damage to structures by feeding on wood and other cellulose materials. Their increased activity during summer means they can cause more damage in a shorter period. They can weaken wooden foundations, floors, walls, and even furniture. Early detection and treatment are essential to prevent extensive damage and costly repairs.

Identifying Termite Activity

Homeowners should be vigilant for signs of termite activity during the summer. These signs include discarded wings near windows and doors, mud tubes on exterior walls, and hollow-sounding wood when tapped. Regular inspections can help identify infestations early and allow for prompt action.

Effective Termite Control Strategies

Effective termite control strategies are essential to combat the increased termite activity in summer. Professional pest control services often use specialized termite equipment to detect and eliminate termites efficiently. These tools can include moisture meters, infrared cameras, and advanced baiting systems that target termite colonies directly.

Preventive Measures

Taking preventive measures can help reduce the risk oftermite infestations. Ensure that gutters and downspouts direct water away from the foundation to keep the soil around your home dry.

Repair leaks promptly and ensure proper ventilation in crawl spaces and attics to reduce humidity levels. Regularly inspect and maintain wooden structures, and consider using termite-resistant materials for new constructions or renovations.

Chemical Barriers and Treatments

Chemical treatments are a common and effective method of protecting against termites. These treatments involve applying termiticides around the perimeter of your home to create a barrier that is lethal to termites.

For existing structures, professionals might also use localized treatments like foams and gels injected into critical areas to eradicate termites on contact. Choosing environmentally safe options approved explicitly for residential use is essential to ensure safety and effectiveness.

Baiting Systems

Implementing baiting systems offers a less invasive method for termite control. This strategy involves placing bait stations around the property to attract termites. The bait contains slow-acting insecticides that the termites carry back to their colonies, ultimately destroying the colony.

This method is particularly effective for subterranean termites and can be a more sustainable option, as it minimizes the use of chemicals and targets termites more precisely.

Professional Termite Inspections

Scheduling regular professional termite inspections can provide peace of mind. Trained inspectors can identify early signs of termite activity and recommend appropriate treatments. They can also offer advice on making your property less attractive to termites, such as removing wood debris and reducing moisture levels around your home.

Takeaway

Warm weather and increased moisture levels make summer a peak season for termite activity. Understanding why termites thrive during this time and taking proactive steps to protect your property is essential.

Regular inspections, effective control strategies, and preventive measures can help keep termites at bay and ensure your home remains safe and sound throughout the summer. You can enjoy the summer season without worrying about termite damage by staying vigilant and utilizing professional services.

A Guide to Water Pumps for Residential Applications

RH Business Marketing Solutions

Are you a landlord or a facilities manager in the United Arab Emirates? Consider installing a water pump at your property. No villa or apartment building, no matter how beautiful, will be rented out if it has no running water or has feeble water pressure – and water pumps can help alleviate or resolve water supply, pressure and distribution issues.

However, before talking to water pump suppliers in the UAE, read this article for useful information on the different types of water pumps used in residential properties.

What Is a Water Pump?

A water pump is a mechanical appliance that moves water from one place to another. It uses different mechanisms, such as centrifugal force or positive displacement, to lift, circulate or pressurise water and, thus, fulfil different needs. 

A water pump draws water in and then uses an impeller (in the case of centrifugal pumps) or gears, pistons, or diaphragms (with positive displacement pumps) to push water out at a higher pressure than it came in. Water pumps are indispensable in modern homes and buildings because they move water across long distances, up multiple storeys and through piping systems.

Types of Water Pumps for Residential Applications

There are many ways to classify water pumps. There are booster, submersible and pool pumps, among others. Booster pumps boost water pressure, submersible pumps operate while fully submerged in water, and pool pumps move water into swimming pool filtration systems.

The following are two types of water pumps based on their mechanism.

1.    Centrifugal Pumps

Centrifugal pumps operate by generating energy in the water through a spinning rotor. Its central component, an impeller, spins rapidly, creating centrifugal forces that drive the water outward from the centre of the pump to the periphery and out through the pump volute or casing.

The movement of the water through the pump increases water pressure and flow rate. This makes centrifugal pumps efficient at moving large volumes of water through pipes and into overhead tanks, among other applications.

There are three types of centrifugal pumps according to the number of stages:

●      Single-stage pump: Single-stage centrifugal pumps have a single impeller assembly.

●      Two-stage pump: A two-stage pump has two impeller assemblies. Going through these two assemblies allows water to become more pressurised.

●      Multistage pump: Multistage pumps have multiple impeller chambers. The water pressure gradually increases as it goes through every impeller assembly. 

2.    Positive Displacement Pumps

Positive displacement pumps move water through the cyclic pumping action of pistons, gears, screws, diaphragms, rollers, or vanes. Unlike centrifugal pumps, which impart velocity to water through a rotating impeller, positive displacement pumps move water by trapping a fixed amount of it and forcing (displacing) it out into a discharge pipe.

There are two types of positive displacement pumps,  differentiated by their mode of action.

●      Rotary positive displacement pumps: Rotary positive displacement pumps use the rotation of cogs or gears to suck water into the pump inlet and push it out through the discharge alternately.

●      Reciprocating positive displacement pumps: Reciprocating positive displacement pumps move water through the forward and backward strokes of a piston, plunger or diaphragm. The retraction of the plunger or piston or the expansion of the diaphragm creates a vacuum that sucks water into the pump chamber. As the plunger or piston moves back into the chamber, it displaces the water, causing it to flow into the discharge valve.

The continuous, rhythmic displacement of water leads to a steady flow rate unaffected by the pressure on the discharge side. This is what makes positive displacement pumps highly reliable for specific residential applications.

Residential Applications of Water Pumps

Water pumps have various residential applications. These include the following:

1.    Water Supply

Centrifugal pumps are often used to supply water to buildings and individual apartment units.

●      They pump water from wells, cisterns or tanks, ensuring a constant water supply for drinking, cooking and bathing.

●      In homes with low water pressure – say, apartments on higher floors – centrifugal pumps can serve as pressure boosters, improving the flow in showers, taps and other water outlets.

2.    Irrigation

Centrifugal and positive displacement pumps can irrigate lawns and gardens. Centrifugal pumps can supply high-pressure water to sprinklers, and may even be adapted by design and through pressure regulators for other irrigation setups. However, positive displacement pumps can be more efficient than centrifugal pumps in irrigation applications.

Water pumps can be used not only for sprinkler systems but also for the following types of irrigation setups:

●      Drip irrigation

●      Soaker hoses

●      Surface irrigation

●      Subsurface irrigation

●      Micro-sprinkler and micro-spray irrigation

3.    Pool Management

Centrifugal pumps are used in the filtration systems of swimming pools and water features. The primary types of pumps used for swimming pools include single-speed, dual-speed, and variable-speed pumps:

●      Single-speed pumps: Single-speed pumps run at a constant speed, circulating water through the pool's filtration system at a steady rate. While effective for basic pool maintenance, they can be inefficient, as they run at full power whenever they are on.

●      Dual-speed pumps: Dual-speed pumps can operate at either a high or low speed. This allows energy savings during low-demand periods while still providing the option to increase speed for heavy filtering or pool vacuuming tasks.

●      Variable-speed pumps: Variable-speed pumps provide precise speed control, so they are only as fast as required. They are the most advanced and energy-efficient option among swimming pool pumps.

Meanwhile, positive displacement pumps can be used in pool maintenance, too. You can use them to introduce liquid solutions into your swimming pool.

4.    Heating and Cooling Systems

Heating, ventilation, and air-conditioning (HVAC) systems can use centrifugal water pumps for heat exchange and transfer.

●      They can circulate hot water in heating systems, including underfloor heating setups.

●      They can circulate chilled water for air-conditioning.

5.    Wastewater Management

Buildings in low-lying areas prone to flooding can have sump pits in their basements. A water pump (either submersible or pedestal) can automatically remove and discharge accumulated water from sump pits to prevent water damage.

Centrifugal pumps are commonly used in sewage applications. However, positive displacement pumps make good sewage pumps because they are excellent at moving fluids with a high solid content. 

6.    Rainwater Harvesting Systems

Water pumps, particularly the submersible variety, are used in rainwater harvesting systems that collect and redistribute rainwater for non-potable uses.


Centrifugal and Positive Displacement Pumps for Your Property

Residential properties and apartment buildings need water pumps. Centrifugal pumps are excellent for moving large volumes of water and increasing water pressure. Positive displacement pumps, with their ability to deliver consistent flow rates, are ideal for tasks that require precision and moving fluids with a high solid content.

Installing and maintaining water pumps, among other things, are part of the cost of buying and owning property. Deliberate on your choice of water pump, making sure to choose the correct variant for your application.


Online vs. In-Store: Saving Money on Home Improvement Supplies

RH Business Marketing Solutions

Home improvement projects can surely improve your living space, making it more comfortable, functional, and visually pleasing. While these projects often come with significant costs, fortunately, there are lots of ways to save money on home improvement supplies, whether you choose to shop online or in-store. This article explores the pros and cons of both shopping methods and provides tips on how to maximize savings on your next home improvement project.

The Rising Trend of Online Shopping for Home Improvement Supplies

Recently, online shopping has revolutionized the way we purchase goods, whether one of our daily needs or something that we want including home improvement supplies. The accessibility of browsing through vast catalogs, reading customer reviews, and having items delivered directly to your door has made online shopping an attractive option for many homeowners. Below are some key benefits of shopping for home improvement supplies online:

  1. Wide Selection and Availability: Online retailers often offer a wider range of products compared to local or physical retail stores. This extensive selection makes it very easy to find exactly what you need, from specialized tools to unique fixtures.

  2. Price Comparisons: Nowadays, you can just look anything up on the internet and get the answer without holding your breath. When online shopping, the internet enables us to quickly compare prices across multiple retailers, ensuring you get the best deal possible. There are websites and automatic coupon extensions out there that can help you track price changes and identify discounts.

  3. Customer Reviews: Online reviews provide valuable insights into the quality and performance of products or sellers. Reading about other customers' experiences can help you make informed decisions and avoid inconvenience on low-quality items.

  4. Convenience: Shopping online eliminates the need to travel to multiple stores, saving you time, effort, and even money! Plus, you can shop at any time of day, making it easier to fit into your schedule.

  5. Exclusive Online Deals: Many retailers offer special discounts and promotions that are only available online. Signing up for newsletters or following your favorite stores on social media can help you stay updated on these deals or you can start stacking some coupons for seasonal sales.

The Advantages of In-Store Shopping

While online shopping offers a lot of benefits, in-store shopping for home improvement or construction supplies has its own set of advantages:

  1. Immediate Gratification: One of the biggest benefits of in-store shopping is the ability to take your purchases home immediately eliminating the waiting game for shipping and delivery. This is especially important for urgent repairs or projects with tight deadlines.

  2. Hands-On Experience: Seeing and feeling products in person can help you better assess their quality and suitability for your project. This tactile experience is very important especially when choosing the specific quality of certain materials like paints, flooring, or tiles.

  3. Expert or Professional Advice: Most home improvement stores employ staff with first-hand experience who can provide expert advice, recommendations, and alternatives. Whether you need help selecting the right tool or advice on how to tackle a specific project, in-store experts can be a valuable resource.

  4. Local Sales and Promotions: Local or Physical stores often have in-store sales and promotions that are not advertised online or at least not yet. Visiting the store can help you discover these hidden discounts.

  5. Avoiding Shipping Costs: While most online retailers offer free shipping, this is not always the case, especially for bulky or heavy items. However, it is still notable that 57% of local consumers prefer stores that offer free shipping. Shopping in-store can help you avoid these additional costs or at the least, minimize the cost.

Tips for Saving Money Both Online and In-Store

Regardless of how you prefer shopping online or in-store, there are several ways and techniques you can use to save money on home improvement supplies:

  1. Use Coupons and Promo Codes: Always search for coupons and promo codes before making a purchase. Websites and coupon extensions like DontPayfull.com aggregate discount codes from various stores, helping you save on your orders.

  2. Loyalty Programs: Many home improvement stores have loyalty programs that offer exclusive discounts, cashback, or rewards points. Signing up for these programs can lead to significant savings over time.

  3. Bulk Buying: If you're working on a large project, you should consider buying supplies in bulk. Many retailers offer discounts for bulk purchases, reducing the overall cost per item.

  4. Wait for Sales: Patience can pay off when it comes to home improvement supplies. Major holidays, end-of-season sales, Black Friday, or seasonal sales are excellent times to find significant discounts.

  5. Price Negotiation: Don't be afraid to negotiate for lower prices, especially for big-ticket items or large orders. Many stores are willing to offer discounts to secure a sale.

  6. Check Clearance Sections: Both online and in-store, clearance sections can be a goldmine for discounted items. These sections often feature overstocked or discontinued products at a fraction of the original price.

  7. Rent or Borrow Tools: For tools that you might only need for a single project, consider renting or borrowing instead of buying. Many home improvement stores offer tool rental services, and you can often borrow from friends or family.

  8. DIY vs. Professional Services: Assess whether you can complete a project yourself or if you need professional help. While hiring a professional can be expensive, DIY projects can save you money if you have the necessary skills and tools.

  9. Shop at Discount Stores: Don't overlook discount stores and outlets that specialize in home improvement or construction supplies. These niche-based stores often offer quality products at lower prices than mainstream retailers.

  10. Stay Organized: Always keep track of your purchases and receipts. Many stores offer price matching or adjustments if an item goes on sale shortly after you buy it. Staying organized can help you take advantage of these policies.

Conclusion

Whether you choose to shop online or in-store, there are a lot of useful strategies to save money on home improvement supplies. Online shopping offers convenience, a wide selection, and easy price comparisons, while in-store shopping provides immediate gratification, hands-on experience, and expert advice. By utilizing discount coupons, loyalty programs, and waiting for sales, you can maximize your savings regardless of your shopping preference. Ultimately, combining the advantages of both methods can help you efficiently and affordably complete your home improvement projects.


Sources and References:
https://www.bigcommerce.com/glossary/seasonal-promotions/
https://fastercapital.com/content/Discount--Unlocking-Hidden-Discounts-on-Purchase-Prices.html
https://www.kevinszabojrplumbing.net/blog/2024/6/10/diy-vs-hiring-a-professional-pros-and-cons-of-home-exterior-repair

Solar Inverters As the Smartest Investment for Your Home's Energy Needs

RH Business Marketing Solutions

According to the National Renewable Energy Laboratory, the average cost of a residential solar system in the United States is around $3 per watt. A typical 6 kW system translates to an upfront cost of around $18,000.

But here's where the savings come in: over the lifetime of your solar system (which can be 25 years or more), you can expect to save tens of thousands of dollars on your energy bills. In fact, the average homeowner can save around $20,000 over 20 years by going solar.

And that's not even taking into account the potential increase in your home's value. According to a study by Zillow, homes with solar panels sell for an average of 4.1% more than comparable homes without solar.

Incentives and Rebates

And the savings don't stop there. Local and state governments offer juicy incentives and rebates for homeowners who take the leap and install solar inverters and other renewable energy systems.

Federal and state governments are doing their part to encourage solar energy adoption. One such incentive is a federal tax credit, which lets you write off 26% of your solar system's cost from your federal taxes. What's more, many states offer net metering programs, allowing homeowners to profit from excess energy generated.

When you factor in these incentives and rebates, the upfront cost of solar inverters becomes much more manageable - and the long-term savings become even more impressive.

The big question on everyone's mind: do solar inverters really make financial sense? The answer is a resounding yes, as long as you're willing to consider the unique factors at play in your situation. Location, energy usage, and system size all come into play, but the rewards can be substantial.

If you're curious about renewable energy, solar power can be a game-changer for your business. By taking the time to crunch the numbers and find the right fit, you can reap the financial rewards of going green and enjoy a clearer conscience.

Choosing the Right Solar Inverter for Your Home

In the heart of your solar panel system lies the solar inverter. This powerhouse converts the direct current (DC) electricity generated by your solar panels into alternating current (AC) electricity, making it safe and usable in your home.

Solar inverters are the unsung heroes of renewable energy. They're the secret to unlocking your system's full potential. But let's be real, choosing the right one can be overwhelming. With so many options out there, it's easy to feel like you're stuck in a sea of similar-sounding products. So, how do you pick the perfect solar inverter for your home?

Assessing Your Home's Energy Needs and Solar Potential

Before selecting a solar inverter, take a step back to assess your home's energy profile. Factors like your home's square footage, energy usage patterns, and budget will help you pinpoint the ideal inverter for your needs.

A solar installer can help you determine the ideal inverter size for your home, taking into account your energy usage patterns. For instance, a larger home with multiple appliances and devices will need a more powerful inverter to meet the energy demands. Smaller homes, on the other hand, can opt for a more compact and budget-friendly option.

Your home's solar potential is greatly influenced by its location, roof orientation, and shading. For instance, homes basking in sunlight with minimal obstruction require a distinct inverter setup compared to those with partial shading or complex roof angles.

Comparing Solar Inverter Options: Features, Efficiency, and Warranties

After determining your home's energy needs and solar capabilities, the next step is to weigh your solar inverter choices. String inverters, microinverters, and power optimizers are the three primary types vying for your attention - and each has its own unique benefits.

String inverters are the most common and affordable option, but they may not be the best choice for homes with partial shading or complex roof angles. Microinverters and power optimizers offer more flexibility and can optimize energy production on a panel-by-panel basis, but they come at a higher cost.

Password to getting the most from your solar panels? Choosing the right inverter. To start, look for high-efficiency models, which guarantee a larger chunk of the DC electricity is converted into usable AC power.

When shopping for an inverter, be on the lookout for advanced features like monitoring and diagnostic tools. These can give you valuable insights into your system's performance and help you identify potential problems before they become major issues. Additionally, exploring options on sites like TheHomeUpgrade.com can provide you with a range of high-quality inverters and valuable information on renewable energy solutions. And remember, a longer warranty can be a big plus in the long run.

Optimizing Solar Energy Production with Solar Inverters

Solar panels are a great start, but they're only half the battle. The real heroes are your solar inverters, converting DC power into usable AC energy for your home. Make sure they're running smoothly and efficiently.

Ideal Panel Placement for Maximum Sunlight Exposure

One of the most important factors in optimizing your solar energy production is panel placement. Your solar panels should be installed in an area with maximum sunlight exposure, typically on a south-facing roof with minimal shading.

If your roof has partial shading or complex angles, you may need to consider using micro inverters or power optimizers to ensure that each panel is operating at its maximum potential. These types of inverters can optimize energy production on a panel-by-panel basis, so even if one panel is shaded, the others can still operate efficiently.

Monitoring and Analyzing Solar Inverter Performance

Take your solar energy production to the next level by tracking your inverter's performance in real time. Modern inverters come equipped with monitoring systems that provide instant access to your energy production, consumption, and savings data.

Keep a close eye on your inverter's performance, and you'll catch any issues or inefficiencies before they become major problems. For instance, if you notice a dip in your energy production, it might be a sign that your panels need a good cleaning or that there's a hiccup with your inverter.

To get the most out of your inverter, regular check-ins are a must. This means scrubbing those panels clean, inspecting for signs of wear, and putting your inverter's efficiency to the test.

To get the most out of your solar power system, regular check-ins with your solar inverter are crucial. By keeping a close eye on its performance, you'll be able to squeeze every last watt out of your solar energy production.

Solar Inverters and Battery Storage Solutions

Solar panels are just the starting point - it's the solar inverter that makes the magic happen, converting DC power into usable AC electricity. And when you combine it with a battery storage solution, you'll be well on your way to achieving true energy independence.

Benefits of Combining Solar Inverters with Battery Storage

What if you could generate your own power and store it for later? That's the beauty of combining solar inverters with battery storage. It's like having a personal energy reserve, so you're prepared when the grid lets you down. No more worrying about power outages.

Solar energy is at its most valuable when you can tap into it during peak hours, reducing your reliance on the grid and slashing your energy bills in the process. With battery storage, you can bank that free energy for when you need it most, essentially creating your own personalized power plant.

Choosing the Right Battery Storage Solution for Your Solar Inverter System

The search for the perfect battery storage solution for your solar inverter system can be overwhelming. But don't worry, it all boils down to three key considerations: capacity, chemistry, and compatibility.

Capacity refers to the amount of energy that the battery can store, and is typically measured in kilowatt-hours (kWh). A larger capacity battery will be able to store more energy and provide longer backup power during outages.

In the world of batteries, chemistry matters. Lithium-ion batteries are the high-performance option, offering more juice per pound and a longer shelf life – but they come at a cost. Lead-acid batteries, by contrast, are a more affordable option, but be prepared to roll up your sleeves and do some routine maintenance.

Before you make a purchase, consider the compatibility of your solar panel system, solar inverter, and battery storage solution. You'll want to ensure they all work together seamlessly, so choose a battery designed to pair perfectly with your inverter and solar panel setup.

For homeowners looking to optimize their solar inverter systems, a high-capacity battery storage solution is a must. Take, for instance, the Tesla Powerwall, LG Chem RESU, and Sonnen Eco - these top-notch batteries seamlessly integrate with popular inverter brands, offering advanced features and unmatched performance.

Improve your energy self-sufficiency and reduce your energy expenses by integrating solar inverters with battery storage. By generating and storing your own clean energy, you'll cut your reliance on the grid and save big on your energy bills. The added bonus? You'll have a dependable source of backup power when it counts.

Conclusion

Solar inverters as the smartest investment for your home's energy needs are a game-changer. They quietly work behind the scenes, converting the sun's energy into usable electricity for your home. By investing in solar inverters, you're not only reducing your energy bills and your carbon footprint, but you're also taking a step towards a more sustainable future.

Solar inverters have a lot going for them - they're efficient, reliable, and cost-effective. With a range of options like string inverters and power optimizers, you're bound to find a solar inverter solution that fits your home's specific needs.

How To Fix Popcorn Ceiling: The Repair Guide

RH Business Marketing Solutions

Popcorn ceilings — once a popular design choice — are now seen as outdated by many homeowners. They can trap dust and some may even contain asbestos (naturally-occuring fibers). 

In this guide, we will walk you through the process of popcorn ceiling repair, from safety precautions to creating a smooth, modern look. We'll cover assessing damage, repair options for both small cracks and large areas, and finishing touches like sanding and painting. 

Let's get your ceiling looking its best!

Safety Precautions (Very Important!)

Essentially, the process of fixing your popcorn ceiling is a breeze. But if you don’t take the right safety precautions, you may feel it is much more difficult than you expected it to be. Here's how to protect yourself:

  • Asbestos Awareness: If your home was built before 1980, there's a chance the popcorn texture contains asbestos. Asbestos fibers, when inhaled, can cause serious health problems. So, it’s best to get your popcorn ceiling tested by a professional before disturbing it.

Damage Assessment and Preparation

Before diving into repairs, it's crucial to assess the battlefield. 

First, grab a flashlight and closely examine your popcorn ceiling. Look for cracks, holes, stains, or any areas where the texture has become loose or missing. The size and severity of the damage will determine the repair approach.

Next, prepare your room because popcorn ceiling repair is a messy business! To protect your belongings, remove furniture from the room or cover it completely with drop cloths. Use painter's tape to shield areas like walls, baseboards, and trim that you don't want to get paint or texture on.

Repair Options (depending on severity)

For small cracks and holes, a simple solution exists. Apply joint compound or spackling paste to the damaged area using a putty knife. Once applied, smooth out the patch for a seamless finish.

But for extensive damage or large areas, a more involved approach is needed. First, you'll need to remove the popcorn texture itself. Use hot water and a scraper to loosen the material. Once removed, sand the surface smooth. Now you have a choice: create a flat surface by applying drywall compound, or for a popcorn texture revival, use a pre-mixed popcorn texture patch. If you're feeling adventurous, a spray texture can be used for small repairs, but achieving a perfect match can be tricky.

Finishing Touches

You've patched, you've scraped, you've conquered the popcorn! But the journey isn't over yet. 

To achieve a flawless, professional-looking finish – you need:

Once your repairs are dry, it's time to eliminate any imperfections. Use fine-grit sandpaper to gently sand the repaired area. Be sure to feather the edges, blending them seamlessly into the surrounding texture. This step ensures a smooth transition and prevents the patch from being noticeable.  

Bonus Tip: Wipe away dust with a damp rag before moving on.

While not always necessary, applying a primer can significantly improve the final outcome. Primer creates a uniform surface, allowing paint to adhere better and achieve even coverage. This is especially helpful if you're using a different type of paint on the repaired area compared to the rest of the ceiling.Opt for a primer specifically designed for ceilings and follow the manufacturer's instructions for application.

Finally, a fresh coat of paint not only brightens the space but can also effectively hide minor imperfections left behind by repairs.Choose a high-quality, flat or eggshell paint specifically designed for ceilings. For a flawless finish, use a roller for large areas and a brush for edges and corners. Apply two thin coats of paint, allowing for proper drying between each. 

Bonus Tip: If you're keeping the existing popcorn texture, ensure the paint you choose is compatible with that type of surface.

Final Words 

With a little planning and these handy tips, you can transform your popcorn ceiling from drab to fab. Remember, safety is paramount, so prioritize testing and wear proper protection. By following these steps, you'll be well on your way to a smooth, modern ceiling you'll love for years to come.